Tuesday 30 June 2015

Mounting winter twigs and pressed plants

Here's a specimen of Juncus articulatus (Jointed Rush) which I collected for some of my own coursework. I'm afraid the page didn't fit on the scanner (indeed the rush was so large didn't fit on the paper either, so I had to think ahead and remembered to press it bent around).


You can submit separate sheets, or if you're dealing with something very flat (like ferns or grasses) you might want to use sheets that are bound (in a pad of drawing paper for example). Some people put their completed sheets of twigs into ring binders or multi-pocket files. In fact, some students don't use paper at all, but attach their collection to one big piece of card. It can look very effective (try to arrange the specimens with taxonomy in mind). It's less portable though.

Herbaria would use sheets of acid-free paper which won't deteriorate or discolour over time. We have a small supply of this but the sheets are not terribly stiff (you may prefer an artists' pad with a heavier weight).

You can attach your specimens with a dab of glue (slightly watered down PVA is good) - but herbaria often like to use a less permanent method, so the plant can be removed for closer scrutiny if necessary. In the photo above you can see how I've used little strips of paper knotted at the back of the sheet. It looks rather good, though I say it myself. You can come and see the herbarium sheets in person if you want a closer look. This is how to do it:


Alternatively, you can leave the strips un-knotted as below (this probably won't work as well with heavier twigs):


Sewing specimens on with thread is another option. Twigs might benefit from being attached by thin wire if you're using a big piece of card to back them (you can buy A1 pieces of 'mountboard' in a rainbow of colours from art shops - they're usually about £4).

You could just use strips of sellotape or other tape - this can look ok if you do it carefully, but unless you use something of 'archival quality' it may eventually dry out and drop off, or stain your paper. (You might not be thinking quite so long term. But it's nice if you can produce the best thing you can and get a few extra marks in the process, and sellotape isn't very aesthetic). I don't like it much, but that's just my opinion.

Large specimens of ferns and bulky flowers / seedheads might be much harder to attach like this, so glue is probably a more sensible choice for those.

If you've got loose seeds you'd like to include, you can put them in a little packet and glue that to the sheet (traditionally at the top right).

The label with all the what, where, when and who information traditionally goes in the bottom right corner of the sheet. I had some preprinted labels to use when I made a collection of grasses last year: you could make a similar template, or just write the bare information straight onto the sheet.


The University of Florida Herbarium has a webpage if you're interested in more detailed methods.

Nepenthes (carnivorous pitcher plant) specimens at the Paris NHM Herbarium (CC photo by F Mey)

You can see some examples of how people presented their 2016/17 'trees in winter' collections here.

In 2018/19 someone presented their seaweed sheets in a very professional looking drop-front box like this and they looked great, and were easily accessible - you could use such a thing for any collection fastened to paper or card.

Friday 26 June 2015

"Native" tree species and others

Henry Fox Talbot lived near Chippenham (not far from Bristol) and was one of the pioneers of photography. This is his 1840s photo of 'An Oak Tree In Winter'. Public domain image.
 The Official Guidance on Blackboard asks you to collect only "native and naturalised" species. I know you can't believe everything you read on Wikipedia, but it has a lovely clear list of British trees and their status which you may find useful.

Native species are those which have colonised this country without human help, and (generally) have been here since the retreat of the glaciers of the last Ice Age. They include sylvian favourites Hazel, Sessile Oak and Hawthorn. (Some species can only be said to be truly native in parts of the country - the Beech is naturally present only in the south where it's warm enough).

Naturalised species can be harder to agree on - they were introduced by people but have since reproduced and created self-sustaining populations. Some are so familiar that you may be surprised they aren't native, like Sycamore, Horse Chestnut and (rather bizarrely) English Elm.

If you stick to the species on that list, you should get a good mark!


Some fernlike things are not ferns

It's not completely unknown for a fern collection to be handed in containing a rogue Non-Fern. I think they were probably included by students who had left everything a bit late and ran round in a panic grabbing everything fern-shaped. So that won't happen to you, because you'll leave plenty of time for collecting and studying and identifying, and no doubt would then laugh scornfully at such rank amateurism.

But everyone has to start somewhere, and so I will use this page to post any species I think of that might confuse to begin with. There's also some help on this in Merryweather's fern key.

A common flowering plant with ferny foliage is yarrow, Achillea millefolium. The millefolium describes its very divided  'thousand leaves'.
CC image by Sigman
In the right season you'd see a tall stem with flowers, :

CC image by O Pitchard
but without this to give the species away, you might just see a lot of the soft feathery leaves. They are very soft and flexible. If you find yarrow, you might consider some kind of trade with someone collecting its family, the Asteraceae. I would say the leaves have a 3-D look with divided bits going in all directions - and that's what looks decidedly unfernlike to me.  No doubt there are exceptions, but I would expect a divided fern frond to basically be in one plane.

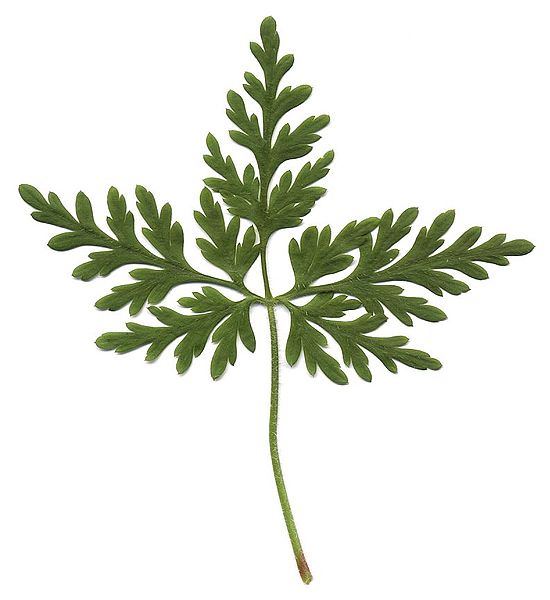
Another species of flowering plant which might cause confusion is Herb Robert, Geranium robertianum. In the right season it'll have lots of pink flowers, and eventually its leaves turn red.  But without those you could initially mistake this leaf for a fern:

File:Geranium robertianum scan.jpg
CC image by Sigman
But if you look at the plant as a whole, you shouldn't get confused, the leaves are usually sprouting from a stem, not emerging from the ground singly. They have a groove in their base which doesn't look very fern-like.

https://upload.wikimedia.org/wikipedia/commons/thumb/e/e8/Geranium_robertianum_%E2%80%94_Flora_Batava_%E2%80%94_Volume_v1.jpg/256px-Geranium_robertianum_%E2%80%94_Flora_Batava_%E2%80%94_Volume_v1.jpg
public domain image
These rogue species aren't going to be a problem for you at all after your initial forays, but I thought they were worth a heads-up.

Of course the best sign that something IS a fern is that it will have little sori on the underside of the "leaf" (- not really a 'leaf', it's called a blade, and the "stem" is a stipe. Ferns have nice words to describe them, as you will discover). And although not all will have sori, really you want to collect the ones that do, as their shape and arrangement will provide extra clues about the species you have found.

Thursday 25 June 2015

How many specimens should I submit?

Last year Katy circulated a table with the minimum number of species you should collect. But they're pretty low numbers in most cases, compared to what you could find with a bit of effort. And she does say that "if you collect this minimum number (and they're all good quality specimens, correctly identified and labelled) then you should expect a mark of around 50%."

Ah but I know you can do better than this. In fact she says "for a first class collection you should be aiming for at least double the minimum number." I think that would be a pretty tall order for some groups (like ferns - and I know firsts have been awarded for far fewer than 16) but for others (like trees and mosses) then it should be readily doable.

My advice is to get stuck in and see how many you can get, which isn't such a big deal if you can do a little bit here and there over the term. But it's still about quality really, not quantity, as if you submit badly preserved, wrongly identified specimens it will rather count against you. But you can do much better than these minimums. And I'd like to hope that you'll want to do better anyway, because you'll become interested in your subject (maybe even a little bit obsessed... talking to your Business Student housemates when they're trying to eat their tea... stopping every few yards when you're walking anywhere so everyone gets fed up... using the fancy terminology in everyday conversation. That sort of thing).

These are the minimums suggested:
Seaweeds: 12 (I'm not sure why this is a higher number but probably because there are many UK species)
Trees in winter: 10
Lichens: 10
Mosses: 10
Fungi: 10
Beetles and other insects: 8
Spiders: 8
Molluscs: 8
Grasses: 8 (easy in the summer but I'd say nice specimens are virtually impossible over winter)
Ferns: 8
Asteraceae (daisy family): 8
Birds / mammals: 6


Using a botanical press

If you're collecting flowering plants (including grasses) or ferns, you'll need to press your specimens before you mount them for your collection. Not only will it flatten them, it'll dry them out - preserving them from mouldering and rotting. Well preserved specimens will last long after your handing-in date: the oldest surviving herbarium collection is Italian and dates to the 1530s. Here's a carnivorous pitcher plant that was collected in the 1890s - it's the 'type specimen' for its species (the exact specimen that was collected and found to be a new species, and was then described and named).

The lowest-tech way is to bring your specimens home and then flatten them under a big pile of books and newspaper. It's better to get pressing as soon as possible before your specimens start looking wilted and sad.

You should leave a little label in with each one to remind you where you got it and what you identified it as. It's better to write a label because the other important thing to do is regularly change the newspaper. If you write on the newspaper you might forget to transfer the details across!

If you can, to aid drying, you could sandwich the plants in between layers of blotting paper as well, with newspaper layers between each blotting-papered specimen. You just change the newspaper, rather than the blotting paper. You can also put in layers of corrugated card in an effort to get the moisture out.

With most reasonably dry specimens, just newspaper should be ok though. But don't just abandon them - you do need to change the paper especially at the beginning, or your specimens could go mouldy.

When you first put them in, they might be unruly, but try to arrange the leaves, stems and flowers neatly, and not twisted / overlapping each other. It can be difficult, but if it's not exactly right, you'll get an opportunity to adjust them when you change the newspaper for the first time (their flatness often means they are more cooperative then) - do this change only one or two days after you first put them in. After that, how often you change the newspaper depends on how succulent your plant is - the wetter it is, the more often you'll need to do it and the longer it'll take to dry - check it every couple of days to start with, but if it's looking fine, then leave it longer. They'll be sufficiently dry for mounting in a matter of days or weeks, depending on size - you'll have to check and judge.

If you've got a specimen that's longer than your press, you can carefully zig-zag it. This especially applies to many grasses and ferns - though it's useful for ferns as it allows you to show the sori on the underside of a frond.

If you have a plant that drops its seeds, you can put them in a little envelope and keep them in the press. Extra large flower heads or pods can even be cut in half to help them dry.

If you want to be a bit more professional, you can make a field press. You can buy them, but I think it would pain me as they can be absurdly expensive, and are often not very big.

What you need (believe it or not) are two large cake drying racks like these:
They'll be the outer layers - the gaps help moisture escape. Put a layer of corrugated cardboard as the next layers in, and then your stacked layers of:
newspaper
blotting paper
plant specimen
blotting paper
newspaper.
You can also put some cardboard here and there between those layer groups, to help wick out moisture.

Now you need something to hold the whole creation together - you need two adjustable straps that you can pull very tight (VERY tight, use your knee or foot to brace yourself a bit!) - some sort of strap with an adjustable buckle. Canvas belts might do it or luggage straps. Space them out so they're squashing everything as evenly as possible.

When everything's secured, you can store it somewhere gently warm, like next to a radiator. I've read that people who live in hot climates recommend you attach your press to your car roof and drive it around like that to help dry the specimens. This may not be the best course of action in Britain. But it does remind you that you can take your press into the field and add specimens to it as you walk around - this can be best because they have the minimum time to wilt.

You can see lots of home-made presses in this google search, so do feel encouraged to have a go. But realistically, sticking specimens under a pile of books isn't a bad option. Don't forget to change the newspaper though!

I've also made some suggestions on how to mount your pressed specimens. 
If you're collecting large ferns you might want to fold some over so they take up less space - you'll want to show the sori on the underside in any case.

Using keys

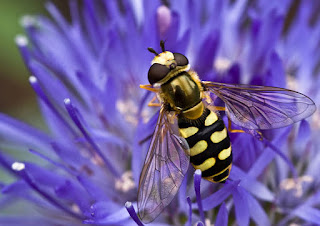
Dunno mate, looks like a wasp to me (actually the hoverfly Eupeodes corollae). CC image by Bas Lammers
 If you don't know what species a plant or animal is, there are various ways of trying to identify it:

You can make a wild stab in the dark (it's quick and doesn't require much effort - but you'll probably be wrong).

You can match its appearance to a picture in a book (this might work for something very distinctive, but pictures often don't show important diagnostic features, and most books don't usually have room to illustrate every species).

You can search the internet for something that looks like it, or ask in a forum (but you can't always be confident of the identification skills of random people).

You can ask an Expert (if you can find one, and they don't get fed up of doing your assignment for you).

Or you can use a key and gradually gain experience and expertise of your own in identifying the group it belongs to. This is more time consuming and requires some effort. But you'll be more likely to get to the correct answer.

Obviously I recommend the latter. Though there's a lot to be said for working with someone with more experience and picking their brain - they can highlight the most important features of your plant or creature. And it doesn't hurt to collaborate with someone who's collecting the same group as you either. You will get used the quirks of your key, but another pair of eyes and a second opinion can often help - and you'll help each other improve.

You'll see I've recommended some keys for each of the taxonomic groups. Various styles exist.

This one's a lateral key - use a strip of paper to mark the features of your own specimen, and compare it to the pattern made by the ones identified in the key:
With apologies to Sarah Whild. Our specimen (a custard cream) must be further down the list.

Lateral keys have an advantage in that you don't have to know every detail about your specimen (say if it's missing its fruit or antennae), or you mistake one of the features - you've still got a chance of matching most features and deducing an answer.

Most keys you'll see are dichotomous - they branch at each step and if you go the wrong way at any stage, you've had it. That's their disadvantage (especially if they're poorly worded or ask you about features you can't see). But a good dichotomous key will give you a selection of clear distinguishing features at each stage. Don't be downhearted if you find it difficult - depending on your taxonomic group, there may be a lot of terminology to get to grips with. But once you've struggled through the key a few times with different specimens, you'll be more confident about what it's trying to help you discern.

Once I know the sort of things the key asks, I find it really useful to start by making a little sketch of my plant or creature annotated with features I notice, or simply make a list. I find it makes it easier when I run it through the key. I'll try to make some pages illustrating this.

I won't rabbit on as the best way to understand your key is to use it - but if you're feeling brave I will just point out below that they can use different numbering systems. Don't feel scared by all the terminology - not all keys are so frightening and in any case I hope you may learn to love all those technical and specific words.

Most keys are set out like the beetle one below - you start by choosing between the pair of statements marked 1. and the "-" below the 1. Then you're given the number of the next pair of statements to read (either 2 or 6 in this case).
from Lindroth's carabid beetle key


An alternative is illustrated below. The pair of statements to compare are marked with the same number (1 and 1). You might also see 1a and 1b in some keys. Stace either gives the number of the next pair of statements to read (eg. 2), or sends you off to another key (eg. 2. Koenigia). A little more confusing perhaps.

from Stace's hallowed Flora


 But the most confusing in my eyes is the one below. You probably won't come across it because it's rather old-fashioned, but I've used it in my forays into identifying flies. The first statement is 1 (as usual) but you have to compare it with the number in brackets next to it (in this case, 4). So you end up having to look down (or even over) the page.

You'll notice that you're not given the number of the next statement to read. That's because you're expected to just move onto the next one. So if you agreed with statement 1, you move down to statement 2 (and its partner 3). Alternatively, if you agreed with statement 4, the next is 5 (and 6).

from Fonseca's key to families of flies

Anyway, I'm sure you'll be fine. But if you do have problems, just come and ask.

Collecting lichens

Nice apothecia. Image by Lairich Rig.
Although you may remember the stupendous trees dripping with lichens at (the very protected) Wistman's Wood on your Dartmoor field trip, there are plenty of lichens in much more accessible places - in fact, there a lot of species even on campus.

Don't forget your handlens (x10 will do). It is the duty of every lichenophile to be shot weird looks by members of the public while squinting through a handlens at apparently uninteresting treetrunks, boulders and gravestones. Don't be embarrassed, they're the ones missing out. It's only when you look at lichens under magnification that you realise how curious and amazing their forms are.

You can read my advice about getting landowner's permission before collecting, which is essential for protected areas like nature reserves and SSSIs - but remember you will be sure to find plenty of common species everywhere. Common sense applies about the amount you take - as the British Lichen Society recommends, leave plenty behind so the species can survive.

Some of them will be firmly attached to walls and pavements of course, and I don't particularly recommend chiselling them out. That's why, although there is an FSC guide to churchyard lichens which you would surely enjoy using, it won't be of great use when it comes to making your collection. You need to find some you can take home.

But you can find portable lichens in all sorts of habitats - on soil on heaths or roadsides, on dead trees in a wood, amongst plants on calcareous grassland, clinging to pebbles on a beach.

Lichen-covered pebbles. CC image by Roger Cornfoot.

Lichens on twigs are particularly easy to collect as you'll find fallen twigs that can be cut into lengths at home - there's no need to remove the lichens and risk damaging them. Many species are of course embedded in their substrate - if they're on the trunk of a large tree you might want to take a sliver of bark off with a knife. Even if they're foliose they may still be connected quite firmly at their base and you will want to ensure you have this as it may show useful characteristics for identification.

However there are issues you just need to be aware of with knives, beyond the obvious health and safety ones - please read what I've written on the fungi collecting page

As you collect you'll need to make a note of where you're finding your specimens - for lichens the habitat, substrate (and maybe aspect) are important. One way to keep everything organised is to make some lichen packets and give them numbers.


It's much better to use paper packets than plastic bags, because any moisture won't stay trapped and turn your lichens mouldy. You should open the packets when you get home and give the lichens an airing. Then they should be fine - they don't need any special preservation techniques.

Read on for more about how to identify your lichens

and how you might present them. 

Lovely lovely Cladonia. CC image by James Lindsey.

Wednesday 24 June 2015

Collecting fungi

Image by CandaceHunter
There's some comprehensive advice on collecting and preserving fungi written by the Queensland Herbarium in Australia, which gives an idea of the standards required for a serious collection. There's plenty to be gleaned from it, even if you don't see your own collection being used for DNA research or being consulted 100 years from now (still, you never know).

They note that a good specimen contains all parts of the fungus - cap, spore bearing gills or other tissues, the complete stipe (stem) and any other distinguishing features. "Rotting, maggot-infested, water-soaked, mould or algae-covered, or withered specimens should be avoided." You may scoff (as if you'd submit such things), but bear it in mind.

It's also good to be aware of legal precedents around collecting fungi: the situation is a little muddled in this country but foraging for mushrooms is permitted as long as you don't sell them on. As I have said elsewhere, technically it is always best to get permission for collecting, and this applies firmly if you are intending to visit protected areas. But realistically, you'll only be taking a specimen here and there, and for Science, so you shouldn't encounter any problems in most locations.

There are many places you can look - meadows, woods, damp fields near streams, on trees (alive and dead). There are even species that grow on other mushrooms! You may find that when you arrive you can't see any... but once you've got your eye in, you'll see them everywhere.

File:Fairy Ring 0004.JPG
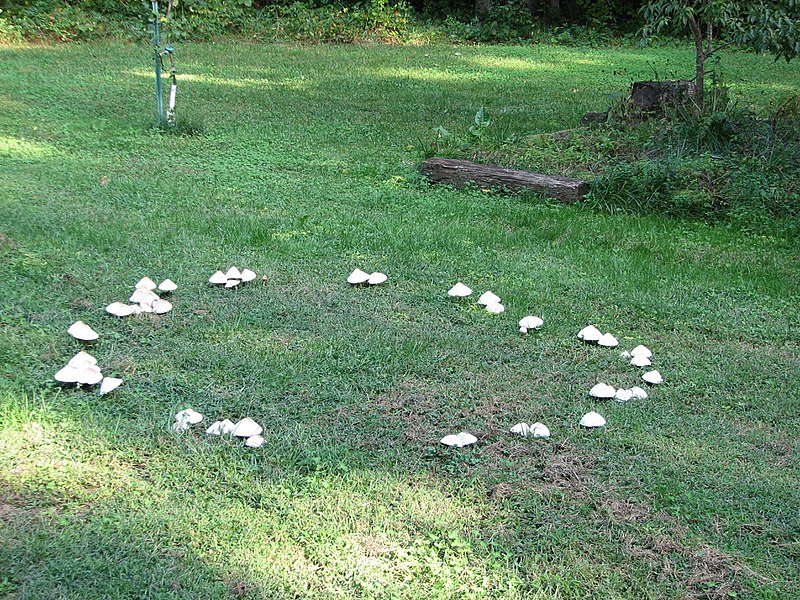
A fairy ring, probably of Marasmius oreades. Is safety in fairy rings on your risk assessment? If you hear strange music, run for it. Image by Aviddoghug.

The main consideration when collecting is keeping your specimens undamaged and keeping track of which you've found where. You don't want to keep fungi in plastic bags or they will deteriorate rapidly. Paper bags are much better - you can pack the fungi individually and write location information on them.

You might want to try labelling with jeweller's tags, but they won't be easy to tie on every form of fungus. Perhaps you'll choose to photograph the specimen in situ - that will also remind you to make a note of the substrate at the site.

And what to carry your collection home in when you don't want it crushed? If you don't mind looking like Red Riding Hood you can use an open wicker basket - it provides excellent ventilation and is traditional and rustic. But if that's not really your style, you just need something sturdy - perhaps a box or two within your rucksack, or even just a bucket.

When you come to pick them, a few species have distinctive features right at the base which you should try to keep intact. Some mycologists would just pick by hand, others use a knife or trowel. (Which reminds me - remember that some species are poisonous, and you probably won't know which they are at the time - so remember to wash your hands before you start on your sandwiches.)

from the Opinel site

You might see a Keen Mycologist from the university wielding his specialist 'mushroom knife' which incorporates a brush at the opposite end to the blade. You might not want to go so far just yet (they're quite a lot of money for a curved knife), but taking an ordinary paintbrush can help clean dirt off your specimens - it stops bits falling into the gills or sticking to slimey caps on the way home.

Bracket fungi and others on substrates like trees and wood might need more persuasion - employ extreme caution if you're using a knife or saw, always cutting away from yourself. Beyond the safety issues there are legal issues of carrying a knife. Common sense says you are carrying and using it for legitimate reasons, for work. But if someone sees you waving a blade around and gets the wrong end of the stick... Just be aware that laws exist. There is official information on the gov.uk website  and various bushcraft sites offer advice from experience. Besides, if you get collecting early enough, you'll have plenty of choice without having to even consider hacking specimens off trees!

17th century woodcut
There's one more legal note, and that concerns Psilocybe semilanceata. In 2005 the government saw fit to make it illegal to be even in possession of this native mushroom. If you found and submitted a specimen, technically you'd be in breach of the law. One would like to think common sense would have to prevail, it being part of a scientific project. However I am not a lawyer.

Read on for information about identification
or about preservation techniques.


Preserving your fungi

Mushrooms preserved in a mushroom-shaped jar. Not a suggestion but quite cute.
Fungi can be so amazing when they're fresh, with their strange fleshy forms and frequently bright colours. It's not surprising that over the years people have tried many ways to preserve the edible ones. Fungi have been pickled, preserved in oil or honey, dried slowly in ovens and desiccators...

The good news is that some species preserve really well. The bad news is that some of them don't. Sometimes it's hard to predict which category yours will fall into.

Some fungi dry beautifully all by themselves; they just need to be left somewhere reasonably dry and warm. The best for this are brackets, puffballs, cup fungi, King Alfred's Cakes... often the ones without gills or pores, or at least the less 'mushroom-shaped' ones.

You can dry 'mushroom-shaped' fungi like this - but the slow process tends to leave them looking a bit shrivelled and sorry for themselves.

Some don't like this method at all - for example Coprinus will probably deliquesce and disappear into an inky stain.

Jason Hollinger air drying some mushrooms
 But - we have a freeze drier that I can dry your fungi in, and often they emerge looking really very similar to the way they went in.  They end up practically devoid of moisture, and very light (rather like the raspberries in your breakfast cereal) - they can also be quite brittle and fragile, though.

If you'd like your samples treated this way, just come and see me. You'll have to bring your IDENTIFIED mushrooms in, and then we'll put them in a freezer. (You really must identify them first, because they will lose so many of their distinguishing characteristics in the process).

Don't freeze them at home, and then bring them in, because they'll defrost on the way, and that is not going to help them. Just bring them in fresh and pop them in the freezer here.

Once they're frozen, I transfer them to the freeze drier, which runs at about -60 degrees C. Then I pump the air out of the chamber so they're in a vacuum. Because of this reduced pressure, the moisture in the mushrooms sublimes - it goes from the solid ice form to a gas, and is taken away.

One more thing to remember - you'll need to think of a way to keep track of which mushroom's which while it's in the freeze drier. Because, of course, you've already identified it.

After your fungi is preserved, you'll want to keep them that way until you display and hand them in - keeping them dry is the most important thing.

How you present your fully labelled fungi is somewhat a matter for your own creativity. You might want to use some kind of single case or box (or lots of little boxes), or perhaps just secure them on a large sheet of card with glue or wire (a popular and successful option). Others have gone for more naturalistic approaches (the Mushroom Diorama, a little like this). Here are a few pictures from the 2016/17 collections. Whichever you use, remember to keep the species' taxonomic relationships in mind and include all the who, what, where and when information on their labels.

Back to identification information 
and thoughts on collecting fungi

Mushroom jar image with CC license by Beatrice Murch

Moss collecting, packets and labelling

Chloroplasts in Plagiomnium moss cells. CC image by Fabelfroh
Technically, the normal advice about collecting applies - that you should have permission from the landowner. Realistically, they would probably look at you askance (though they're unlikely to say no, especially when you explain you are only after a little sample in the interests of science). But you really should ask if you want to collect at protected sites like nature reserves. However, the advantage of mosses is that there are many specimens to be found by foraging in public places - they're everywhere. The more habitats you look in, the larger the number of species you'll find. So try the tops of walls, between the cracks of pavements, in springs and at the sides of streams, in woodland, on heaths and in bogs, in lawns... there are many options even in the city. My car's not quite so bad, but one of my colleagues once brought me a specimen that was growing at the edge of his windscreen.
How to make packets for your specimens.
Before you go out collecting, you'll want to make some moss packets. I find you can't underestimate how many moss packets you'll want! Once you get your eye in you'll probably see a lot more species than you expect. I usually get confused at the variety, and because their features are so small, it's not always obvious in the field whether two specimens are different. So if in doubt, take a little sample of both. Also, you are bound to get stumped on identifying a few of them, so having more than you eventually intend to end up with is not a bad thing.

You can make your collecting moss packets from scrap paper. If the mosses are a bit damp, the paper will soak it up - it's better than using plastic bags. When you get home, open the packets for a while so they dry out (you don't want your specimens to go mouldy).

When I go collecting I keep my left pocket for empty packets and my right pocket for full packets... perhaps I'm easily confused but I find this a useful method. It doesn't stop me losing my pencil every five minutes. A pencil is better than a pen for writing on a damp packet.

Naturally you need to know where you got each moss. Rather than writing notes on soggy paper you're probably better off sticking just a number on the packet, and writing all the attendant details in your field notebook as you go along. Where are you on the map? What's the moss living on? Is it in damp shade or braving it out on a sunny wall top? What's growing round about? 

How much of each moss should you take? You need a tuft to a matchboxful.. not just a few threads, but don't go devastating a population. Obviously, don't take all of it if there's only a small amount! The BSBI code of conduct reassures you that "collecting small amounts of plant material for identification purposes, for private herbaria, for research or as voucher specimens is usually acceptable... indeed collecting is often necessary if botanical expertise is to be developed."

It's worth noting whether your sample comes from a cushiony mound or a straggling mat - different species have different forms and it'll help in your identification.  The capsules on their stalks (the sporophytes) can be very diagnostic, so if your moss has those, include some. Most mosses and liverworts can be easily removed from their substrate with your fingers. Ones on stone might sometimes benefit from a bit more persuasion - though more because it can be difficult to lever them off without breaking them, rather than because they're clinging on so tightly.

A moss sporophyte capsule. CC image by Des Callaghan.

When you examine the contents of your packets closely, you might find that what you thought was one species is actually a collection of several - a bonus.

When you've identified your specimens you'll want to put them in a nice new packet for presentation.
Traditionally this is the method bryologists use - the packets sit nicely behind each other in a narrow box, and you can order them taxonomically. If you want to be innovative that's honestly fine, though you will have to confront the combined weight of many many decades of bryologists and their beloved packets. Maybe it's time for something more creative though. It is the 21st century after all, and if you can present them more attractively you may pull in more people to be bryologists. You never know.

This is how I was taught to label them:

You can see I've got who collected and identified it in the top left corner.

The what of the Latin name is in the centre. You don't have to put the authority after it, but it's easy to find it out on the Natural History Museum's Dictionary of UK Species., where you can check you've got the most up-to-date name too.

In the top right hand corner is a number (starting M for mosses or L for liverworts) - again you might think this is overkill but if you want to use it, it's the official checklist number that the British Bryological Society use. You can download the spreadsheet from this page.

I've also added the Order because that would help me arrange my species taxonomically in their box.

On the bottom left you have the when  of the date it was collected.

In the bottom right corner is the where.

You can also add a note about the habitat or substrate, as I've done in the centre.

A Japanese moss garden. Very neat. CC image by Paul Mannix

Tuesday 23 June 2015

Guidance on the monograph

CC image by Nic McPhee
This part of the assignment requires you to be succinct: you've got to squash everything you want to say into 500 words, so there's no room for waffling. You have to give a list of references too (not included in the 500 words, fortunately) so do try to pick sources that sound authoritive and not just some dodgy page off the internet, unless it's something like the British Bryological Society's website. It may not hurt to put in the details of the undoubtedly reputable keys you were using to make your identifications.

As you're presenting a taxonomic collection, the most important thing to focus on is some taxonomic information. The Guidance suggests - how many families / species are in your group in the UK, and how many are in your collection? What are the key diagnostic features of your group / each family represented? Are there any rare / interesting specimens in your collection?

The Guidance also suggests you can make remarks about the ecology or human uses of your group, but not to make that the main focus of what you write. So I guess this includes interesting things like: the habitats where they're found; the variations of their 'form and function'; any economic, social or cultural importance; any particular existential threats they face.


Most people seem to leave this part of the assessment until last - and perhaps that's very sensible, as by then you are more familiar with your group. But you probably don't want to leave it until the extreme last minute as it's actually quite difficult to be succinct, and you'll probably have to spend some time editing and moving around your thoughts to make them readable. Ultimately it's a daft thing not to spend some time on this because 500 words isn't a big deal, but it can earn you up to 15 relatively easy marks. That's 15% and the difference between a high 2:2 and a first. Ok - realistically, if you haven't been arsed with doing anything much up until now, it's unlikely to make that level of difference, but making effort here could help tip you into the next bracket of marks.

Some words about the marking scheme

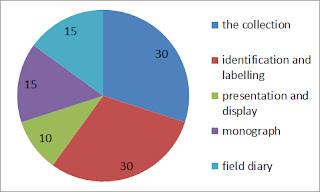
You can read the official guidance on the marking scheme on Blackboard. This is the basic structure:


You can see that you're going to pick up a lot of points merely by getting organised early and doing the things the guidance asks you to do - it's not some subjective number plucked out of the air, so make sure you're following, and it you can get a high mark!

The 30% for 'the collection' means you'll be assessed on the quality and quantity of your specimens. Keep collecting throughout the year and you will get lots to put in - try not to leave everything until the last minute. People often ask how many they should submit, and I've written some thoughts here. Choose specimens that are undamaged and show the critical diagnostic features. Preserve them in a manner appropriate to the group you're collecting.

With 'identification and labelling' you can easily pick up marks just by including all the essential what / where / when / who information. Of course, accuracy of identification is very important! But if you collect a wide variety specimens you may be able to afford leaving out any you're unsure of. It's better to submit fewer specimens which are identified correctly, than loads of which half are wrong.

Presentation and display only offer 10 marks - but if you can be neat and set your specimens out taxonomically, clearly and attractively, it's surely an easy 10 marks? If your handwriting is illegible (or even if it's not) you can print your labels. I've tried to offer some advice about ways to display your specimens in the information about each taxonomic group. You can go down the traditional route or let your imagination roam.

The official guidance sets out in detail what should be in the field diary and the monograph- if you make sure you follow its advice, you will get marks accordingly! As I've said elsewhere, the field diary "only" gets 15% of the marks. But recording things in it diligently will pay dividends when you come to identify and label your specimens.

Just a small word of caution - some of the group-specific guidance on Blackboard is quite 'vintage' so be aware that some identification books recommended may have been superceded... I hope I've given you some more recent ideas on this website though.

Monday 22 June 2015

'Who' - the final bit of essential information

The author assists a student in identifying some aquatic invertebrates


There aren't that many people out there who have the skills you'll develop while you're doing this assignment. 
And not only that, you'll be producing a record of the species that exist out there right now - and quite probably (because not that many people are doing such a thing), the species you collect and identify might not have been noted from the particular area you took them from before. Possibly ever, and at the least, often not for a long time.
So your records could be really useful - they can feed into a bigger picture about the biodiversity of this country and how it might be changing.

Around Bristol you could send your records to the Bristol Regional Environmental Records Centre (BRERC) - the people there would ensure your data would be sent to specialist recording schemes (see below) and eventually added to the National Biodiversity Network (NBN) Gateway. From there it could be used for all sorts of useful research, even contributing to scientifically supported changes in government policy (yes such things have been known).
If your gathering took place further afield, you can find the appropriate records centre on this list from the National Forum for Biological Recording.

Or, you may prefer to send them directly to one of the many recording schemes for specific groups of organisms: the national Biological Records Centre has a list of them (including certainly niche but perhaps nerdily cool things like slime moulds, ticks and stoneworts). In fact, if you get really into your subject, you'll be able to find much future support from these groups.
Different recording schemes might require your records in slightly different formats - but one thing all of them will want is the What, Where, When and Who.

The Who is you - as it's likely that you will have both collected and identified your specimens. So technically, you should add your name to each of your labels.
Without the who, you've certainly got a taxonomic collection, but you haven't truly produced any biological records with a potentially wider value. However, you may say that your work is supposed to be marked anonymously, and that you don't want (and shouldn't have) your name on it. You certainly won't be marked down for not putting your name on it, and from the point of view of the university, you probably shouldn't put your name on it. There is the dilemma and I leave it with you.


'When' - the third essential thing on your label


Make sure you distinguish your records from those of these US botanists one hundred years ago: write '2015', not just '15' for the year.
 Each specimen you submit should be labelled with the date you collected it.


You want to make this as unambiguous as you can.

In Britain, we usually write the date in the form Day : Month : Year. so 1/4/2015 means the first of April.
 But Americans tend to put Month : Day : Year. 1/4/2015 meaning the fourth of January.

Some people even put the Year first (I know, how crazy can you get): 2015/4/1 - and who knows what on earth that's supposed to indicate.

So to be clear, I suggest you use this format:
the day as a number, the month in words, and the year in full:
1 Apr 2015.

Here's a hypothetical label you might stick in with a snail. Obviously yours would be beautifully neat.


You can see I've got two dates, one for the Col (collected by) date, and one for the Det (determined by) date. The date it was determined (that is, identified) isn't so important, so just gets the year.

You may rightly consider this double-date business overkill, but it is an example of what might happen if a specimen were sent away for a specialist to identify. Or perhaps if a collection were very old and a museum curator was going through it checking the identifications and updating the names.

Noting 'When' is not just about good administration. It can help you (and your marker) identify your species.

Image CC by Chrumps


This year I saw an adult Rose Chafer beetle (Cetonia aurata). The adults are only present in the summer, from May until July. The beetle's lifecycle takes two years though: the rest of the time it exists as a larva feeding underground. Therefore, if I labelled my beetle with a February date, you can be fairly sure I've either misidentified it, or that global warming must be really speeding up now.

Read on for the final element of your labels - the 'who'.

'Where' - how to record locations

Crown copyright and database right 2015. Ordnance Survey (Digimap licence)

You do need to label your specimens with the location you found them. For one thing, it might be very useful in supporting your identification. Some species prefer particular habitats: woodland or coastal sites for example. Some species are very common in the south of England, but disappear towards Scotland. Some might be relatively new to this country and your specimen, as a record of its spread, could be of wider interest.

At a minimum you should include a 6-figure grid reference. This identifies the 100m square in which your specimen lies. This sheet by the Ordnance Survey is a good reminder of how to take a reference from a map.

 But if you want to bypass using your brain, you can use something like Grid Reference Finder which is very easy to use (right click to get the answer plotted on an OS map).


Much, much more fun to a map nerd like myself is the excellent Edina Digimap. 
You can sign up and access it through your university log-in. It allows you to zoom in ridiculously close, and even more excitingly there's a Historic Digimap (which is the nearest thing to time travel available at the moment). You can also waste hours looking at land use and geology. You also can download data for your GIS projects, so I recommend signing up.

You may be in possession of a gps or phone that uses the National Grid, and seemingly it may offer you 8 or even 10 figure grid references. But be wary - 8 figure implies a 10m square and 10 figure a 1m! It's unlikely to be so accurate. Six figures are fine (you can just knock the end ones off from each half of the result, so ST62131 77988 becomes ST621779).


(You might prefer Latitude and Longitude (gridreferencefinder.com also provides these) and you could use these instead of an OS reference if you want. There are various ways to express these co-ordinates - for example in decimal degrees, or as degrees, minutes and seconds. It would be up to you to choose: just be consistent. Decimal degrees seems to be the commonest thing. I do prefer the Ordnance Survey to be honest. But if you're a Google Maps fan, that works with lat/long. )


All those letters and numbers are pretty dry and meaningless on their own, so you should add some sort of description of where you're talking about, i.e. a place name.  You want to use something that would mean something to others, and be reasonably large scale. For example, 'Lockleaze', or 'Wetmoor Wood'.

You might also add a little description of the habitat ('on shingle', perhaps, or 'limestone grassland'). With fungi you might want to note the substrate the species was growing on ('on dead wood', 'on birch tree') and this might also be interesting to include for many invertebrates ('on cow parsley', 'on dung').

Sometimes you might have a standard label which encourages you to fill in other details like altitude - though altitude's a bit too specialist for most collections!

(for a lichen)


You could always devise your own label a bit like this, so all your labels look the same. And it does help you remember to record all the parameters.


(This amateur didn't underline her Latin names. Don't copy her slack habits.)

The herbarium label above includes a VC (Vice County) number. Victorian botanists divided the country into lots of similar-sized areas and they're still used for biological recording. If you were going to submit your records to a national recording scheme (and they'd welcome them), you'd want to include the Vice County. The Herbaria United website has an app for working this out. You don't have to use the VC on your collection though, unless you want to.


Read on for information about the 'when' for your labels.