Showing posts with label seaweeds. Show all posts

Monday, 18 February 2019

My new love of seaweed

White Nothe headland (CC Jim Champion)
I had a pleasant week's holiday in Dorset last week. We went looking for fossils on the beach (de rigeur for the 'Jurassic Coast') - and I found the most amazing fossil sea urchin. But also discovered a new interest - seaweed. Yes, you can picture me in an anorak fighting the horizontal rain, stuffing slimy algae into a carrier bag - it's more or less accurate.

It's very interesting embarking on a new group of flora or fauna though. It's interesting how you don't even realise how little you know. I thought 'oh yeah, I know a few seaweeds' - but I don't really. I know as much about seaweeds as a botanist who can distinguish a dandelion from a nettle. But you have to start somewhere. And that's one of the first useful things you can feel your brain doing - noticing that one specimen is different from another, even if you don't know their names.

I soon realised there were a lot of different seaweeds washed up on the beach. And some of them were in a place I'd not thought about before: they were tiny and growing on other seaweeds. I suppose it's like when I first got interested in snails, in that not all UK snails are shaped like the familiar garden snail - some are tall and pointy, some are super tiny, some are even spikey. I like the sensation of a hidden world becoming revealed. Yes, you will become one of the Initiated. (It's surely no worse a use of your brain than knowing all the minutiae of the football league or what the latest technological must-have is, and you could even use your knowledge to help protect the natural world).

Calliblepharis cilliata - how could you not like all those weird eyelashy outgrowths?
Some things, once collected, can be put aside and dealt with at leisure. But seaweed is more needy, as I soon realised, instinctively feeling that leaving it in a plastic carrier bag in a heated house might have led to domestic arguments. So I rinsed it under the tap and improvised some paper to press it between. Some of the specimens survived. But some types decayed because they needed more care (more changes of paper) and I wasn't organised enough to assemble the correct equipment. I don't want you to be in this position, where you make an effort but then it amounts to nothing.

That's one reason why you shouldn't leave all your collecting until the last minute, because it takes time to realise what the best techniques are for dealing with your specimens.

But another reason is that you need some time collecting and observing to start recognising what you've seen already, and to be able to pick out what's new. At first you don't see everything - you can only take in the broad picture, and you'll overlook all sorts of weird and wonderful things. It's that extra stage that can only happen with time really. This is an assigment you can get a good mark on - you just need to give yourself a bit of time to do yourself and it justice. That's my advice.

I bought a new seaweed book. Of course. I should stop spending all my wages on books, but there always seems to be another interesting one to be had. I must realise that owning a book does not equate to knowing or understanding the information in it, though.


My new purchase is 'Seaweeds of Britain and Ireland' (2nd ed.) by Bunker, Brodie, Maggs and Bunker (2017). Keen seaweed student F also has a copy and has apparently been finding it very useful. The photos certainly seem very clear and there's a lot of description and information. I felt a bit overwhelmed thinking about the number of species (the book has over 200 and there are over 600 around the UK - who knew). But they're such beautiful things and I do want to try to recognise a few more than my current paltry efforts. I recommend. You're welcome to come and look at my copy also.

I have been looking at the Seasearch website (the instigators of the book), and if you're keen on diving they run identification courses around the British Isles - the idea being that you can then go out and start recording sea creatures and seaweeds for yourself, or on one of their special survey days. Imagine the fun (if only I could trust myself not to drown).

Friday, 27 April 2018

Collecting on the beach

Maggie Hambling's 15ft high scallop sculpture at Aldburgh. CC image by CMGlee
 I have a lovely book called 'The Essential Guide to Beachcombing and the Strandline' by Steve Trewhella and Julie Hatcher. It has everything you can think of that you might find on a walk on the beach, from seashells and seaweed to fishing litter and nurdles. It doesn't mention the legal implications of beachcombing at all, which is a) a bit surprising but b) probably entirely sensible given the complications.

'Edible Seashore' by John Wright tries to lay out the situation for foragers. He says "a tender belief lodged firmly in the bosom of most people in these islands is that they have a legal right to walk along any shore that does not sport a 'private, keep out' sign. Sadly, they are wrong. There is no general right of access to the coast and the shore is not some briny species of common land."

Precisely who owns a 'beach' (the bit above the high tide mark) is not always obvious. You'll probably want to get across that to the 'foreshore' (which is the bit between the low and high tide mark). Half of that's owned by the Crown and the rest is divvied up between local authorities, the National Trust, and various other individuals and organisations. Realistically, as long as you stay out of places with big 'No Trespassing' signs, you probably won't get into any altercations. If you can work out that the National Trust (for example) does own the bit of shore you're after, then it would be nice to seek their permission to do your collecting there. This would be especially important if your beach is a nature reserve or SSSI. They might be encouraging even so, so don't be afraid to ask (just ring up or ping them an email to explain your very low-impact and scientific intentions). They may even be interested in a list of what you find.


Rules about foraging relate mainly to just wild fruit, fungi, flowers and foliage. The 'Four Fs' have to be growing wild, and be for personal use only (you can't sell them, or it becomes theft). So if you're collecting empty shells, then you'd imagine this is of little interest to the law (gathering live shellfish to eat or sell would be a different issue). Seaweed doesn't start with an F either, and no general right to gather seaweed exists. But again, if you're not taking wheelbarrowfuls to sell, and you're not trespassing, you shouldn't get into any bother.

This article and its comments on the subject in the Guardian are quite interesting.

In short, seek permission where you can, and obey any local rules.

And if you take some litter home with you while you're at it, then you'll have positively improved the environment!

Wednesday, 15 November 2017

Your new skills can help make a difference

A lot of moths visiting a trap in Brunei, 1982. CC image Accassidy.
The other afternoon I was listening to Inside Science on Radio 4, and they had a piece about 'moth snowstorms'. That is, people were remembering when they would drive along in the countryside at night, and moths would be flying in from all angles into their headlights, and they'd have to start their windscreen wipers. It's certainly not something I've experienced in my lifetime. In fact it seems quite a mad idea, even though it must have been unremarkable not so long ago. Something that did ring a bell was motorcyclists saying they used to have to stop regularly and clean their visors of squashed flies. I can remember (in the 90s) saying to my dad that my friend's car was covered in gummy dead insects, and him complaining that it must have meant we were driving too fast. Some people suggest cars might be more aerodynamic these days, which might account for why gummy insects don't seem to be a problem. But that doesn't explain the visor thing - there'd still be insects on visors.

My point is, we seem to be losing insects, fast. Data from amateur entomologists' malaise traps suggest a loss of 75% in the last 25 years. I don't need to tell you that sounds pretty terrifying, when insects are a fundamental part of the food chain and pollinate a lot of plants (including our food plants). It was astoundingly refreshing to hear that the alleged environment minster, Michael Gove, has actually come round to the idea that neonicotinoid pesticides need stricter controls. One can only hope it's not shutting the door after the horse has bolted. You'd imagine spraying pesticides all over fields can't have helped matters, in addition to problems caused by other modern farming methods. So perhaps stopping spraying them might help restore some of the invertebrate populations.

A malaise trap. CC image Ceuthophilus. Nothing to do with uneasy-feeling malaise (though that may be for the insects), but actually invented by the Swedish Mr. Malaise in the 1930s.
Whilst this sounds like environmental doom and gloom (which yes, it probably is) - you have chosen this degree course so presumably want to try to make the world a better place. You can be part of the antidote to your own gloom. By developing your identification skills and submitting records to recording schemes and records centres, you can help make some difference. Your data can feed into a big picture which can persuade the powers that be to actually do something. This might not be a straightforward process because it involves politics. But having the scientific evidence has to be of critical importance, surely.

You might think "ah, what difference can I make? :( " But there really aren't that many people out there who have good identification skills. Particularly if you focus on something even slightly obscure. If you chose to go to a local habitat and record what you find, it's possible that nobody would have done that for ten, twenty years (or even ever). You might find something Really Interesting, and conceivably that could help get the site a modicum of protection one day. And even if you don't, it all becomes part of valuable data about today, and can be compared with what happens in future, and if records exist, with what was present in the past. (iRecord is an easy way to submit a record of anything you find, but if you prefer the support of a specialist scheme, the Biological Records Centre has a comprehensive list of contacts.)

Student A's lovely lichen find. CC image Jason Hollinger (California)
The other day, one of the third years popped in to see me. She chose lichens for her collection last year and got really into them. She'd been out lichen-hunting recently. When she got home and looked in her 'Dobson' guide, one of them seemed to be something unusual. The only species that seemed to match was a distinctive orange-grey lichen with little eyelashy spines around the fruiting bodies. But Dobson said it had only been seen in very few areas and was now thought extinct in this country. She had a tiny sample and we both squinted at it down the microscope. Nothing else seemed to match. I said I thought she should speak to David Hill, my esteemed lichen tutor from my course.

It turns out she was right with her identification and he was "super excited". Isn't that amazing! So this is proof that you too can find and report something excellent. She's brought something back from apparent extinction. I guess the poor lichen was never quite extinct in the first place (though it's evidently very rare) - but the point is, how many people are looking at lichens, and how many people have the skill to identify them? Not many. So your developing skills can make an impact. You can be one of an elite group that is knowledgeable and enthusiastic about lichens, beetles, mosses, or whatever it is that grabs you. We can only conserve things when we know they exist. You will be able to contribute to the body of knowledge of what's out there. Be encouraged.

There are links to over 200 recording schemes at the NBN Gateway.


Friday, 3 November 2017

For your Christmas list*: a hand lens

(*Other popular religious and secular present-buying opportunities are available. Or just treat yourself.)

I've just been to Dartmoor with the new first years. Likely you went on this trip yourself and will be able to recall the amazing Wistman's Wood, an eldritch botanical wonderland dripping with lichens and mosses. I think it's one of my favourite places.

CC image by Alex Jane
Students are obliged to spend some time collecting data about un-botanical things like wind speed. But whenever possible I tried to lure them towards close examination of the weird and diverse species covering the trees and boulders. A few people looked like they got seriously hooked, which was very gratifying. And I think the secret to an appreciation of lichens and bryophytes is a simple thing: a hand lens.

I wish I could present one to everybody but it seems university bean-counters are not keen. I can always lend you one (quality and smeariness varies). But ultimately I would urge you to consider getting one yourself. It doesn't have to cost much and it will last you a lifetime. Plus you will always have it to hand if it just lives in your bag. And you won't have any slight squeamishness about holding it right up to your eye after a dozen other people have had it in their clammy hands. Seriously, it will open up a entire microscopic world that you cannot really predict. I'd say it makes Everything more interesting - the unsuspected detail of plants and invertebrates and all sorts. But in the short term it'll certainly make your collecting a more interesting experience and make it easier to identify what you're looking at.

Like I say a million times, 'Hold it right up to your eye'. CC image from the National Park Service.
But what to get? Magnification of x10 is fine for most things. You can get twin versions which have (say) a x10 at one end and a x15 at the other if you're feeling fancy. Another thing to consider is the diameter. My lens is about 15mm across. Larger diameters are recommended.  I thought I was quite happy with mine but now I'm starting to wonder if a larger diameter wouldn't be better - it transmits more light and makes things easier to see.

You do want something that's of good enough quality that it's not going to annoy you with its blurry pointlessness. You don't necessarily have to spend huge amounts though.

This Quicktest page shows you how different lenses vary in quality (which is quite eye-opening) and therefore in price. They have a large range for sale and they make it very clear what you're getting. There are also many other reliable places, like the local company Brunel Microscopes, or UKGE, or entomological suppliers like Watkins and Doncaster,

 This is the one I have at the moment, from Quicktest, which is about £30 with delivery. It has a slightly larger size than most, so lets in a bit more light, and seems super clear - I'm really pleased with it. But you don't have to go that mad - something about £15 can be pretty decent, judging by the advice linked to above. Cheaper ones are a good way in but they're necessarily blurrier and more likely to fall apart. I bought a load of half-decent ones for work last year, but they're extremely pocketable and disappear constantly. This is disappointing and makes me loathe to spend as much again - but then spending less is a false economy if the lenses are rubbish. So if you're even half keen it's a good reason to get your own and look after it - it should last a lifetime if you don't lose it!

I'd also recommend getting a lovely bright lanyard to attach to it. Then it's much easier to find if you put it down somewhere or it falls into the vegetation. There's a huge selection on Ebay, for example. If you wear your lens round your neck you will recognise and be recognised by other natural history buffs, like some sort of weird masonic tie / handshake. This is not necessarily a bad thing: you might meet someone knowledgeable and interesting. Nerdy, probably. But nerdy about something interesting.

Public domain image by Bill Gillette - girl on a fieldtrip in the Rockies, 1972
A useful thought I read recently - when you're using it, think of it as a keyhole. That is, you must put your eye right up to it to see through. Either bring the object you're looking at towards your eye, or (often more undignified but unavoidable) bring yourself close to the object. The latter is why you might see lichen enthusiasts sprawled across the landscape, bums in air, apparently pressing their faces against the rocks.

And finally, it's possible to integrate this low-tech highly-useful bit of equipment with modern technology: with a bit of practice you can take photos through it with your mobile phone. And those would be perfect stuck in your notebook.

(P.s. - What's more, a lens will repay you handsomely on the field trip to Tenerife, where there are many fascinating plants with strange adaptations to examine microscopically. I much recommend getting one in readiness for that).

Monday, 31 July 2017

2016/17 collections: seaweed and marine molluscs

I was impressed by this marine shell collection which was submitted as a resit. It's beautifully presented and labelled. It comprises a wide range of correctly identified specimens, and they're carefully displayed so the distinguishing features of the shells can be seen (the spotted cowrie with its little mirror is ingenious). It was given a mark of 77%.


The labelling is clear and includes the type of habitat in which the shells were found - which is useful in addition to the location and grid reference.


The collection includes a rare example of a field notebook actually written in the field. At least, that's what it looks like, with its wind-blown looking notes in pencil. Yes it looks rough and ready, but something of this nature is what the markers will want to see in addition to all those detailed descriptions, annotated diagrams and maps and so on.

Marine molluscs didn't seem to be a popular choice this year, and nor did seaweed. But this is a good example from the seaweed collections that were submitted (I'm afraid my photo is not so good):


You can see where the student has floated her specimens onto pieces of card and then used a photo album to protect them. She collected 15 examples, which were well distributed across the brown, red and green species. Seaweeds can be difficult to identify so larger samples are good as they may be more likely to show well-developed diagnostic features. The labels were praised for their content but the feedback stated they 'would be better if typed' - so if you can pick up a mark or two for simply typing your labels, it definitely seems worth the effort of doing so. This collection was given a commendable 66%, but an extra mark here or there might have been gratefully received. The monograph was given excellent marks (12/15) for being well researched and presented, 'with good reference to your own collection' - another thing worth taking on board.


Here's a picture of the corresponding notebook. I liked the hand-drawn map with personal observation of the habitat (something you won't get with the OS), plus the use of a scale on the photo.


Friday, 17 February 2017

Seaweeds and ferns: a science/art crossover

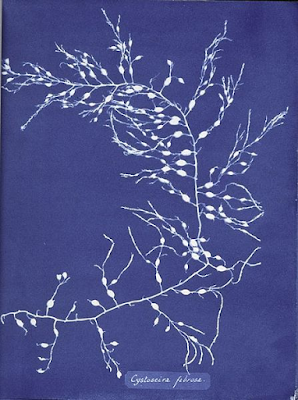
plate from Anna Atkins' Photographs of British Algae cyanotypes
One of the plates in Atkins' "Photographs of British Algae - Cyanotype Impressions."

You won't know this, but I have a qualification in Printmaking from this very establishment. And so, it's of interest to me that there exists an interesting Seaweed/Printmaking crossover. It's very relevant to the history of Identifying Things and might even inspire you in the display of your own specimens.

Anna Atkins was born in Kent in 1799. Her father was a Fellow of the Royal Society of London, so she had science in her blood (and the advantage of being born into a family where money wasn't a problem). He translated French scientist Jean-Baptiste de Monet Lamarck's "Genera of Shells" into English. And she provided the illustrations of the shells (ah yes I knew I'd squeeze snails into this somehow). You can see them here on Flickr.

But that's by the by really. The point is, through her father she met William Henry Fox Talbot (who lived not far from here) who was the chap who created the first photographic negative image. She took up photography and so would have been one of the first women to do so. Her father also knew John Herschel (son of astronomer William Herschel) who was instrumental in improving photographic processes. He invented the cyanotype. Under his mentoring, Anna Atkins mastered this technique.

Anna Atkins in 1861
Anna Atkins in 1861, singlehandedly supporting the British fabric industry
Cyanotypes don't need a camera. You photosensitise a piece of paper using a mixture of ferric ammonium citrate and potassium ferricyanide. Then you artfully arrange your subject - in this case seaweed, one of her passions - directly on the paper, and leave it in the sun. The sun-exposed areas turn a deep Prussian Blue, leaving a silhouette, but you also get information about the overlap of the fronds, as the sunlight permeates the different thicknesses. The chemicals are then washed away from the unexposed parts of the paper, leaving a negative image. You might be familiar with the idea of 'blueprints' - well this is the original blueprint from which the term arose.

Atkins used this technique to produce the world's first ever book produced entirely by photographic means, which was published in four volumes between 1843 and 53. She'd have to have made them all individually of course! So only 13 copies are known. But thanks to the marvels of the internet, you can see selected plates here at Flickr, or if you're interested, the New York Public Library has all four volumes for you to look at.

I tell you what, if anyone wants to have a go, I've got the chemicals... you're more than welcome.

Highlighting her motivation, she says in her introduction: "The difficulty of making accurate drawings of obects as minute as many of the Algae and Confervae, has induced me to avail myself of Sir John Herschel's beautiful process of Cyanotype [...]". Cyanotype's not very good for handwriting though, I can't read the rest very well! But whatever, as a result of the book, photography was established as an acceptable, accurate way of producing scientific illustrations.

 After this Anna turned her attention to another Victorian favourite, making cyanotypes of ferns.

Atkins' cyanotype of bracken

So there we have it, a female science/art pioneer. However, it wasn't all carefree larking about with plants and chemicals for women in those days. I read in this article which notes that although she was elected as a member of the Botanical Society of London, women members weren't allowed to speak at meetings and nor could they hold office. At least Science has moved on since then (though I hear some golf clubs are still struggling with the concept).

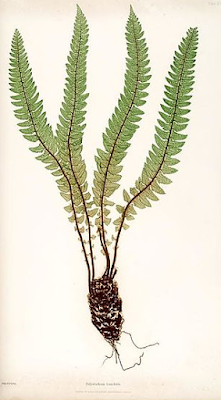
Bradbury fern nature print
From Bradbury's fern book
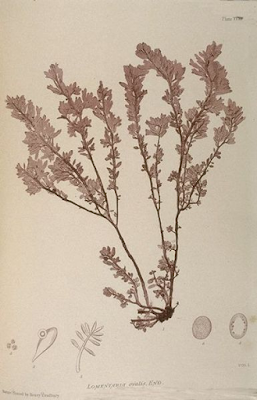
I'd also like to tell you about another Victorian method of botanical illustration, that of "Nature Printing". But it's a bit more technical (in fact, details were sometimes Top Secret at the time) and I don't want to bore. One of its chief proponents was Henry Bradbury and he produced the illustrations for Thomas Moore's 'British Ferns'. You'll notice they're very naturalistic - they were made by a process where the fern was directly pressed onto a prepared plate. The plate was then used to print many books, so it was a lot more convenient than the cyanotypes. Bradbury learnt from a master nature-printer in Vienna called Auer, and improved on his method back in London. He also published the lovely Nature-Printed British Sea-weeds in 1860. But very sadly he committed suicide the same year for reasons that are now unclear, and he was only 29.

Bradbury seaweed nature print
One of Bradbury's nature-printed seaweeds.

Other seaweed resources inc. a key for identification

'Seaweed Gatherer' by French impressionist Paul Serusier (c1890)
With my current snail infatuation, I know I'm guilty of neglecting other groups that people might be collecting. So this morning I've been looking around for some resources for seaweeds.

I've spotted this key to seaweeds by Emma Wells. She's written it allegedly for beginners. However, it is full of seaweedy jargon... but she does explain it all in a glossary at the start. The pictures are all at the end, whereas it might be nice to have them as you go along? But you will have to see how you get on, and report back. I'm going to print a copy off, so if you come in you're welcome to use it. She's based it on seaweeds at Milford Haven, on the south coast of Wales.

If you're growing to love seaweed as a result of your collecting, you might be interested in Fergus Drennan's 'British Seaweeds in Season' in which he talks about which ones are tastiest. But he doesn't talk very much about looking for sewage outlets nearby, something worth bearing in mind I would have thought.

Dried cochayuyo (Durvillaea antarctica - kelp seaweed for eating) in a market in Chile. CC image by McKay Savage.

Also, I like the information via the FSC's Rocky Shore Species page. There aren't too many species, but there are the common ones you're bound to come across, and each one gets an interesting write-up. It's probably the sort of ecological information you might want to scribble against each species in your field note book after you've identified it.

Another thing you might find interesting is the British Phycological Society's Check-list and Atlas of the Seaweeds of Britain and Ireland. It has all the up to date names for the species and their taxonomic relationships. And this is followed by maps with dots for each 10km square where the species have been recorded.

I rather liked this small selection of species at the BBC's Discover Wildlife site because artist Dan Cole has painted them as they would be seen by something living in a rock pool (hmm. maybe something like a snail...) - they are stretched out and floating freely. I thought this might help inspire you to display the specimens in an attractive way that shows their structure and identifying features. Many seaweeds look a bit sad when they're out of the water do they not.

With this in mind, you might want to look at Seaweed Collections Online which is a project to gather together images of specimens in museums around the country. You can see how other people have coped with the difficulty of squashing a three-dimensional plant onto a two-dimensional bit of paper. The 1850s album on the home page is just beautiful.

spicy seaweed cracker. CC image by Calgary Reviews. I need my dinner.

Sunday, 25 October 2015

Strange seaweed

I really like Mr Adams' book on snails, as I rather think we have the same sense of humour. I enjoy seeing what he's got to say about his subjects, even if he was saying it 120 years ago and there are much easier books to learn from now (and importantly, which use current taxonomy).

So I enjoy surfing to see what else was written in those times. Today I spotted the seriously antique 'Seaweed Collector's Guide' of 1853. My eye was caught by the following piece of advice:

"I must now caution young beginners to keep apart from other plants all the different varieties of the genus Desmarestia, for they posess the peculiar property of changing the colour of, and very soon decomposing, all other plants, especially those of the finer species, with which they may come in contact.

 "Notwithstanding what has been alleged to the contrary, most of the Desmarestiae, if kept out of sea-water, even for a very inconsiderable time, soon become flaccid, and rapidly advance towards decay."

He says that specimens must always be transported in seawater, as they get irreversibly ruined if you put them in fresh water. He sounds a bit peeved that he's made this observation and somebody is questioning whether it's his imagination or not (Notwithstanding...).


Desmarestia aculeata: public domain image from a Victorian seaweed herbarium in France.

I couldn't help wondering what all this was about. It turns out to be rather interesting, as you can read on the Friday Harbor Laboratories' webpages. The Desmarestia stores sulphuric acid inside its vacuoles - resulting in an internal pH of 0.8 to 1.8 (really very low, like stomach or battery acid). So when the vacuoles burst, it's no wonder your specimens get ruined.

Researchers have shown that grazing sea-urchins are, unsurprisingly, put off from grazing Desmarestia and any other species that it's growing with. The acid erodes their 'teeth' and I imagine it wouldn't feel very nice elsewhere either. It seems that the sulphuric acid vacuoles have evolved as an anti-herbivore measure.

Friday, 25 September 2015

General thoughts on collecting


Finnish entomologist Johan Sahlberg and his botanist wife Mimmi, just before they left on their honeymoon field-trip in 1873. Photograph by Antero Saalas.

 The Legal bit: Technically, you should only collect where you've been given permission by the landowner. Realistically, if you collect a sprig of grass from a roadside, no-one is likely to demand you are thrown in jail. But bear it in mind that under the Wildlife and Countryside Act, it is illegal to uproot any wild plant without permission from the landowner. 'Plant' includes algae, lichens, mosses, fungi and vascular plants. You don't need to uproot anything of course, just take parts of it. If you haven't got permission to be on someone land, you shoud confine yourself to public land and footpaths, or else you could get in trouble for trespassing, and that's before you've picked a thing. It doesn't hurt to be following the Countryside Code in general.

It is quite complicated in law, because there's no single law that covers such things. You do have some rights as a 'forager' which have built up around collecting plants for food. The British Mycological Society have some sensible advice regarding picking fungi but you'll find there's increasing worries about people collecting large amounts of mushrooms and then selling them to fancy restaurants (selling things on is not really in the spirit of traditional foraging).

Also, it is very tempting to want to go to a nature reserve to collect - after all, that's surely where all the nature is? Actually, you'll find you can collect a remarkable number of species from uncontroversial places. If you really do want to collect at a nature reserve, you should ask first. In my experience they may give permission - just contact the relevant Wildlife Trust (etc.) and explain you are doing a taxonomic collection for university and only want a specimen or two of common species. Reassure them that you will not be digging anything up, least of all their rare species. Always take the minimum amount of material necessary wherever you are.  

 There's more advice in the Wildflower Society code of conduct. You might also want to read the Botanical Society of Britain and Ireland's code of conduct. It encouragingly says "Collecting small amounts of plant material for identification purposes, for private herbaria, for research or as voucher specimens is usually acceptable, except in the case of protected or Red List species. Indeed, collecting is often necessary if botanical expertise is to be developed."

 The Amateur Entomologists Society has similar advice concerning invertebrates. Although I feel pangs of guilt killing them, the main threat to species in this country is habitat loss. The code points out that "collecting should always be limited to the minimum necessary for the purpose intended, as well as by full compliance with legal requirements relating to particular sites and species."   

It is rather unlikely you'll come across rare species (the clue being in the name). Surprisingly, very few are specifically protected by law. Obviously, if you're in a reserve where one exists, you should make yourself aware of its appearance and avoid collecting any.

In short, use common sense and all will be well. Stick to public places and no-one will threaten you with a shotgun. Develop a casual demeanour and learn to shrug off the strange looks the public will doubtless throw you. Never be without a plastic bag or collecting pot. The latter is the best bit of advice I can give you :)

 
The Health and Safety bit: 

If you look at the course guidance on Blackboard, you will see that before going out collecting it requires you to send a risk assessment to Katy. This is not so onerous, as there is a generic version on Blackboard - you just need to go through it and remove anything irrelevant to your own situation, and perhaps add in anything extra. 

For example, you can delete any of the chemicals you won't be using for preservation. You've survived this long so presumably you are good at common sense - but here's a recap anyway-

Take someone with you (it's more fun, besides).
 Let someone know where you're going and when you ought to be back (a map and a phone are useful too).
Especially if you're like me, take a snack and something to drink so you don't pass out in a ditch.
Take your medicine with you if you suffer from some life-threatening illness (now I feel like I'm talking to my mother).
Take some sensible clothing and footwear with you (and now I am turning into my mother).

Fill in your details on the form - send a copy to Katy and keep a copy for yourself.
Then you can go forth and start collecting.


Wednesday, 19 August 2015

Collecting seaweeds

Gaugin's 'Seaweed Gatherers'. You probably don't need this much.
I wasn't actually around in the Victorian era, but I am a fan of the writings of the Victorian naturalists. They're often full of very practical advice. I'll refer you to W H Grattan (writing in 1872) for some tips:

At once then, to the shore, but not to the sandy shore, for only useless decayed rubbish, or here and there some straggling Zostera marina will be met with. The collector must away to the rocks, and search carefully every pool he meets with, from a little distance below high-water mark, and so on down to the water's edge, always remembering that it is better to collect while the tide is receding than as it is coming in.

He describes how the red species will be found mostly on the lower shore - they are adapted to the lower light levels - but that you may also find them growing on the stems of kelps that have been washed up. 

When you collect your specimens, you want to take enough of the thallus (the entire seaweed) to make sure you can identify it - include both the leafy bits - the blade, and the stemlike bit - the stipe. The Official Guidance for the assessment suggests you also include the holdfast, the rootlike bit that holds on. However, I've also read that you should definitely leave this because it will enable the plant to grow back.

My advice is to be sensible - nobody is going to mind if you take a piece of bladderwrack when the species is carpeting the beach. And ideally you should always seek the permission of the owner - they are likely to be perfectly happy to allow you and indeed may be very interested in your findings. I know - all those years of beachcombing as a child... you never asked for permission and it might seem absurd... but I'm just giving you the information so you know the official line. I've written a page about collecting on the seashore here.

While in the field, don't forget to make careful notes on the specimens' location and habitat. You'll need to know which one you got where - you could put them individually into labelled bags, or make some sort of label to tie on (they'll have to be waterproof, remember).

Back home, the specimens have to be attended to straight away. Grattan says:

Beginners should be cautioned against the error of bringing home too many plants at a time, or lose choice specimens which will decompose unless they are attended to before night. The first thing is to empty the bag into a basin of sea-water and select the best plants, giving each a good swill before placing it in another vessel of clean water. Get rid of rejected plants at once.

He then describes how to mount the specimens - I have written some advice here.

Identifying seaweeds


William Morris's 'Seaweed' wallpaper. Possibly not an actual species.

At first, before being overwhelmed by the 600 or so species around the UK, you might want to look at the thirty on the Field Studies Council's Common Seaweeds Chart. We have some copies you can borrow, but the chart won't break the bank at £3 if you want one of your own. The drawings are very clear and the reverse has a simple key to steer you in the right direction.

You might also like this simple chart of common seaweeds from Coastwatch.

We also have copies of Collins' Sea Shore of Britain and Europe (with drawings) and Oxford's Photographic Guide to the Sea and Shore Life of Britain and North-West Europe. These have more species and more detailed descriptions of the species.

But I've just bought a copy of 'Seaweeds of Britain and Ireland' by Bunker, Brodie, Maggs and Bunker and am finding the photos and descriptions very useful. There are several copies that you can borrow. I've made a guide to the species we often find on the 1st year field trip, and this book has completely transformed my confidence in identifying seaweeds. It's laid out very helpfully and there are lots of photos. This is the one I'd recommend most I think!

Here is a link to Emma Wells's 'Field Guide to the British Seaweed', which has a wide range of species and also keys. It makes a lot more sense to me now I've become a bit more familiar with the species. I don't find it that easy to flick through on line, and the photos are in alphabetical order rather than being next to species that look similar (as in the Bunker book) - but if you are prepared to use the keys and need something digital, I think it's very good for pointing out the important features of the different species.

There are photos and detailed descriptions on The Seaweed Site which you might find useful - it's an Irish website but most species should be similar. It includes 'alien' species which might have arrived too recently to be in the older keys below. It's also full of general information about seaweeds which might come in handy for your monograph.

Seaweed identification isn't always easy because plants can vary hugely in appearance according to the degree of wave action where they grow, how much light they receive - or even how much they've been eaten. They may not even be the colour you expect. So you do need to progress from just looking at pictures - with the help of a key you can look closely at detailed features of the algae and (with luck) reach a more accurate identification. And of course, showing your use of a dichotomous key is part of the assessment.

To demonstrate your proficiency, you can turn to Hiscock's 'Field Key to the British Brown Seaweeds' - it's quite approachable and doesn't use too much technical language. You can download it here. It's only £6 to buy from the FSC if you want a book of your own, and we do have copies you can borrow.

Alternatively, there is her 'Field Guide to the British Red Seaweeds'.  This one's out of print, but we have borrowable copies, and there is one in the library. You can also download it from the FSC website.

We also have the standard book for chlorophyta, Brodie et al.'s 'Green Seaweeds of Britain and Ireland'.  This is a more serious tome, using more terminology and microscopic examination. You might want to try it though to confirm your green seaweed hunches.


CC image by Conscious
Names change over time as taxonomists refine their ideas - so it's a good idea to check you've got the current version by using the Natural History Museum's Dictionary of UK Species.

You could use your new seaweed taxonomy skills to contribute to the greater good - the Natural History Museum and the British Phycological Society want the public's records for monitoring a range of species. They want to investigate how distribution is changing over time and in the face of global warming.

View more seaweed-related posts.

Wednesday, 1 July 2015

Preserving and presenting your seaweeds

In the name of educational advancement, I hope the University of British Columbia Herbarium don't mind me showing you this beautiful example of a seaweed herbarium sheet to inspire you.


Larger sturdier specimens can be pressed immediately between newspaper in a botanical press - remember to lay them out in the arrangement you'll want for the final display. You might need to check and change the paper more often than for less soggy plants - you don't want your specimens to go mouldy. Some herbaria recommend cutting the biggest stipes or structures in half if you want to press them. (Peter Mcinnis suggests that they can be encouraged to press by being soaked in hot seawater - I guess, bring some home with you and heat it up!)

The specimen in the photo at the top will have been 'floated'. For this you'll need a tray of water. If your seaweed is rather delicate, it's likely to end up stuck to the paper you use now - so herbarium paper or artists' paper is good (we have some you can use). Put the paper in the tray (possibly with something as a firm layer behind it) and spread your specimen out on top, so the water helps you arrange the delicate structures with forceps or a paint brush. With really bushy specimens (eg. the calcareous red species) you might want to prune some areas so the branching patterns of a single layer are more easily seen. Grattan describes the process in detail (he does suggest you need a porcupine quill and an ivory paper knife, but you can probably manage without those, thank goodness).

Image by Peter Mcinnis (public domain)
Remove the paper carefully from the water, blot it as much as you can, and then transfer to it to your press, layering with newspaper.  Don't forget a label!  Tighten your stack of specimens really firmly and put it in a warm pace to dry. When you reopen the press to change the paper, I've read that you should allow the papers to cool first or the specimens may curl.

W H Grattan's seaweed press
I've written some advice about making and using your own press here.

And what I've written here about mounting specimens will also have a lot of relevance for your seaweed collection - some you might want to tie on, or you might use glue.

Update: I've found this rather comprehensive guide to preserving your seaweed here, at the Cryptogamic Botany Company. It's easy to read and has lots of photos.