Friday 17 February 2017

Seaweeds and ferns: a science/art crossover

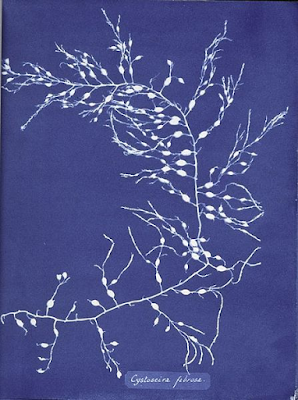
plate from Anna Atkins' Photographs of British Algae cyanotypes
One of the plates in Atkins' "Photographs of British Algae - Cyanotype Impressions."

You won't know this, but I have a qualification in Printmaking from this very establishment. And so, it's of interest to me that there exists an interesting Seaweed/Printmaking crossover. It's very relevant to the history of Identifying Things and might even inspire you in the display of your own specimens.

Anna Atkins was born in Kent in 1799. Her father was a Fellow of the Royal Society of London, so she had science in her blood (and the advantage of being born into a family where money wasn't a problem). He translated French scientist Jean-Baptiste de Monet Lamarck's "Genera of Shells" into English. And she provided the illustrations of the shells (ah yes I knew I'd squeeze snails into this somehow). You can see them here on Flickr.

But that's by the by really. The point is, through her father she met William Henry Fox Talbot (who lived not far from here) who was the chap who created the first photographic negative image. She took up photography and so would have been one of the first women to do so. Her father also knew John Herschel (son of astronomer William Herschel) who was instrumental in improving photographic processes. He invented the cyanotype. Under his mentoring, Anna Atkins mastered this technique.
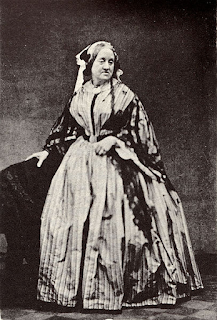
Anna Atkins in 1861
Anna Atkins in 1861, singlehandedly supporting the British fabric industry
Cyanotypes don't need a camera. You photosensitise a piece of paper using a mixture of ferric ammonium citrate and potassium ferricyanide. Then you artfully arrange your subject - in this case seaweed, one of her passions - directly on the paper, and leave it in the sun. The sun-exposed areas turn a deep Prussian Blue, leaving a silhouette, but you also get information about the overlap of the fronds, as the sunlight permeates the different thicknesses. The chemicals are then washed away from the unexposed parts of the paper, leaving a negative image. You might be familiar with the idea of 'blueprints' - well this is the original blueprint from which the term arose.

Atkins used this technique to produce the world's first ever book produced entirely by photographic means, which was published in four volumes between 1843 and 53. She'd have to have made them all individually of course! So only 13 copies are known. But thanks to the marvels of the internet, you can see selected plates here at Flickr, or if you're interested, the New York Public Library has all four volumes for you to look at.

I tell you what, if anyone wants to have a go, I've got the chemicals... you're more than welcome.

Highlighting her motivation, she says in her introduction: "The difficulty of making accurate drawings of obects as minute as many of the Algae and Confervae, has induced me to avail myself of Sir John Herschel's beautiful process of Cyanotype [...]". Cyanotype's not very good for handwriting though, I can't read the rest very well! But whatever, as a result of the book, photography was established as an acceptable, accurate way of producing scientific illustrations.

 After this Anna turned her attention to another Victorian favourite, making cyanotypes of ferns.

Atkins' cyanotype of bracken

So there we have it, a female science/art pioneer. However, it wasn't all carefree larking about with plants and chemicals for women in those days. I read in this article which notes that although she was elected as a member of the Botanical Society of London, women members weren't allowed to speak at meetings and nor could they hold office. At least Science has moved on since then (though I hear some golf clubs are still struggling with the concept).
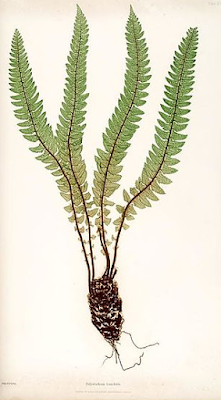
Bradbury fern nature print
From Bradbury's fern book
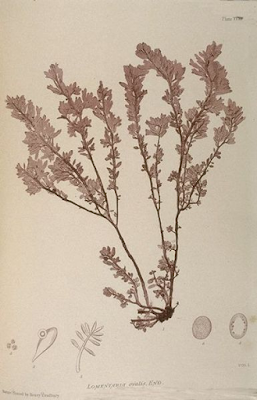
I'd also like to tell you about another Victorian method of botanical illustration, that of "Nature Printing". But it's a bit more technical (in fact, details were sometimes Top Secret at the time) and I don't want to bore. One of its chief proponents was Henry Bradbury and he produced the illustrations for Thomas Moore's 'British Ferns'. You'll notice they're very naturalistic - they were made by a process where the fern was directly pressed onto a prepared plate. The plate was then used to print many books, so it was a lot more convenient than the cyanotypes. Bradbury learnt from a master nature-printer in Vienna called Auer, and improved on his method back in London. He also published the lovely Nature-Printed British Sea-weeds in 1860. But very sadly he committed suicide the same year for reasons that are now unclear, and he was only 29.

Bradbury seaweed nature print
One of Bradbury's nature-printed seaweeds.

Other seaweed resources inc. a key for identification

'Seaweed Gatherer' by French impressionist Paul Serusier (c1890)
With my current snail infatuation, I know I'm guilty of neglecting other groups that people might be collecting. So this morning I've been looking around for some resources for seaweeds.

I've spotted this key to seaweeds by Emma Wells. She's written it allegedly for beginners. However, it is full of seaweedy jargon... but she does explain it all in a glossary at the start. The pictures are all at the end, whereas it might be nice to have them as you go along? But you will have to see how you get on, and report back. I'm going to print a copy off, so if you come in you're welcome to use it. She's based it on seaweeds at Milford Haven, on the south coast of Wales.

If you're growing to love seaweed as a result of your collecting, you might be interested in Fergus Drennan's 'British Seaweeds in Season' in which he talks about which ones are tastiest. But he doesn't talk very much about looking for sewage outlets nearby, something worth bearing in mind I would have thought.

Dried cochayuyo (Durvillaea antarctica - kelp seaweed for eating) in a market in Chile. CC image by McKay Savage.

Also, I like the information via the FSC's Rocky Shore Species page. There aren't too many species, but there are the common ones you're bound to come across, and each one gets an interesting write-up. It's probably the sort of ecological information you might want to scribble against each species in your field note book after you've identified it.

Another thing you might find interesting is the British Phycological Society's Check-list and Atlas of the Seaweeds of Britain and Ireland. It has all the up to date names for the species and their taxonomic relationships. And this is followed by maps with dots for each 10km square where the species have been recorded.

I rather liked this small selection of species at the BBC's Discover Wildlife site because artist Dan Cole has painted them as they would be seen by something living in a rock pool (hmm. maybe something like a snail...) - they are stretched out and floating freely. I thought this might help inspire you to display the specimens in an attractive way that shows their structure and identifying features. Many seaweeds look a bit sad when they're out of the water do they not.

With this in mind, you might want to look at Seaweed Collections Online which is a project to gather together images of specimens in museums around the country. You can see how other people have coped with the difficulty of squashing a three-dimensional plant onto a two-dimensional bit of paper. The 1850s album on the home page is just beautiful.

spicy seaweed cracker. CC image by Calgary Reviews. I need my dinner.

Thursday 16 February 2017

More on winter tree identification (and oaks)

The Queen Elizabeth oak in W. Sussex. It's pretty big. CC image Pam Fray
I wonder if you've heard of Nominative Determinism... there's a fair bit of it around amongst the staff of the Environmental department actually. Or maybe that's just because lots of British surnames have nature-related themes, who knows. Anyway,  here's a downloadable key to winter trees that I found this morning, to supplement others I've suggested. It's been created by Leif Bersweden (nominative determinism) of the Species Recovery Trust.

I found it via Kevin Widowson's twitter feed which itself has lots of nice photos of winter twigs at the moment. The thought that led me there was about Oaks. I was on a field trip the other day and we went to a local nature reserve that looked at first like an unprepossessing park where people walk their dogs. But actually there were some superb and huge oak trees around its edge. Old oaks are grand and noble and twisty and pretty distinctive with their very blocky bark. But if their rugged outline's not enough, they do have quite an unusual arrangement of buds. As I looked up at the twigs silhouetted against the grey February sky I could easily see the buds were in clusters at the ends of the twigs.

I also found a superb resource from the EU Science Hub Forest project, The European Atlas of Forest Tree Species. It has lots of interesting information on the ecology, habitats and cultural importance of many species (i.e. things you might even want to mention in your notebook). Also, you can make some taxonomically-relevant comparisons - I was reading about goat willow (Salix capraea) and it compares the different soil moisture / light preferences etc. of different willows.

There are also pages about the two native oaks in the UK, the English oak (Quercus robur) and the Sessile oak (Quercus petraea). For some reason I've never been able to get all the names and features of the two species straight in my mind. So here is my attempt to. It sounds like they should be readily distinguishable even in winter when the usual things you'd check (the leaves and acorns) are not about.

Quercus robur (CC Sten)
Quercus petraea (CC Sten)
Quercus robur                                      Quercus petraea
aka English oak                                    aka Durmast oak ('mast'=acorns)
aka Pedunculate oak                             aka Sessile oak

buds are ovoid                                      buds are pointy
buds are hairless (although                  buds have long white hairs
  may have fringey edges)
buds are said to have less                     buds are said to have more
  than 20 scales                                       than 20 scales


'Pedunculate' and 'Sessile' are words meaning 'stalked' and 'stalkless' respectively. But my problem has always been to remember to what they refer.
Q. robur  has pedunculate (long stalked) acorns, but (confusingly to me) a short stalk to its leaves.
Q. petraea has sessile (stalkless) acorns, but a long stalk to its leaves.
You might think this is a bit of an academic point in the winter, but it's always worth a look in the leaf litter for clues.

It's also said that Q. robur has blunter-tipped acorns than Q. petraea. And I've read different colours for the descriptions of the twigs. But colour always seems a bit too subjective to me, especially if you've only got one specimen in front of you. It's more the sort of thing you get a 'feel' for as part of the overall character of the species, that you might notice once you've seen and examined quite a few trees.

Their outlines, due to their way of growing, can also differ - Q. robur supposedly spreading out with irregular twisting branches and the main trunk still large and visible in the crown, whereas Q. petraea is ideally more orderly with a straight main stem and straighter branches in sensible size order. Of course, their appearance will depend on not least where they're growing - on their own or amongst lots of trees in a forest. And their age. So I don't think it's entirely clear cut.

Quercus robur, being the arboreal symbol of England, is, unsurprisingly, found in the lowlands of England. Quercus petraea is native to the oak woods of Western Britain. So you should probably be on the look-out for both. Also, to confuse matters (as ever), the two are quite variable and can even hybridise, producing trees with intermediate characteristics. Thanks a lot, trees. People are determined to pigeonhole everything into separate categories. But you confound us.

Oak leaves and flowers (male catkins) emerge from the buds. CC image Kenraiz


Tuesday 14 February 2017

Further snail enthusiasm

Clausilia bidentata. CC image Hectonicus. You too can find one of these.

I had a day off last week, but when my sister and I went for a walk, we couldn't help ourselves and started rummaging through the leaf litter for some snail shells. Yes, it seems my blog has inspired one person, even if it's not someone who has to submit a collection. I see this as a minor triumph.

Altogether, I now have about 22 species. That would make you a pretty nice collection. It's not too hard to find so many - mine have largely come from flowerbeds and leaf litter, with a few that are particularly fond of woodland or limestone.

I cannot help thinking of one of the more depressing collections of recent years, which comprised a series of garden snails (Helix aspersa) arranged in a supposedly artful spiral, with a variety of imaginative identities attached. You don't have to do that, it's just not necessary when there are so many species that you will be able to find.

I've just noticed that my copy of Cameron and Riley's 'Land Snails in the British Isles' is the first edition, so now there's a second edition, it might be that the keys are even more straightforward to use. But don't be downhearted if you get stuck - even Cameron says "It is to be expected that some material will be unidentifiable."

I'm building up my collection of labelled specimens (and I know the ones I'm most/less certain of) - so if you want to bring in your own, we can always compare shells and opinions - I'm sure we'll both learn something.

Wednesday 8 February 2017

Snails in February... a report back.

In solidarity with aspiring snail-hunters I went for a wander around campus yesterday. I've got some observations you might find helpful.

Winter snail hunting is cold and it makes your hands cold and filthy and damp. Clearly you can't wear woolly gloves or you'd ruin them. But if you're feeling particularly delicate you might want to wear some lab gloves. I didn't wear any, but I might have felt slightly less apprehensive about the random slimy touch of cold slugs if I had. You're going to have to poke about through a lot of mud and gack.

In fact, the best thing you could have with you is a good stout stick - perfect for raking through muddy leaf litter and stirring up the dirt. I couldn't seem to find one, which meant I was at the mercy of spiky brambles, bits of glass and other unknowable debris.


Also you want a bag full of pots (for shells that you find in each location) and some sealable plastic bags (for handfuls of leaf litter that you can search through later). And a pen to label those things with your location. I've got plenty of pots you can borrow.

It'd help if your bag is waterproof so you can abandon it anywhere while you search - everywhere at the moment is damp. I've got a rather strange plastic box with a shoulder strap which is rather good (plus it's unsquashable so samples survive). You're inevitably going to have to put your knee on the floor, so something waterproof to kneel on is good. I mean you could wear waterproof trousers, but you're going to look odd enough as it is, so I'll leave that decision up to you.

CC image by Colin Smith
So I searched in the vegetation around the ponds by hand (difficult, and no luck) and I also hunted amongst leaf litter (productive) and amongst moss and around tree roots. I wandered down to the 'suds system' valley with the ditchy stream in the bottom - that's got a lot of long dryish tufty grass to stir through, and then there's piles of half-rotting vegetation by the stream itself. I know. I make it sound so glamorous and romantic. But I did find a few down there as well.

I think it may not be the easiest season in which to look. But there's certainly plenty out there and you will find decent empty shells as well as hibernating and lively snails. I brought my finds back to the lab. I thought I could easily pour some boiling water on the live ones to see how difficult it would be to extract them from their shells. It turns out I'm far to soft for that. Especially once they stuck out their cute little eye tentacles. There was no chance after that. But if you're as soft as me, I am confident you will still find enough vacated shells to produce a decent collection. Just make sure they're in good condition or you will confuse yourself (it's not helpful if they lack the mouth lip or shiny surface or even hairs that they should have... take it from me).

CC image by Santeri Viinamäki

You will need to measure the shells' widths and heights. For that a pair of vernier callipers is good - I've got some you can borrow so please ask. Also, it helps a lot if you can draw your snail, as it makes you realise how tight or loose the whorls are, and helps you concentrate on the shape of the mouth and relative pointiness of the spire, which are important identifying features. This is not easy if you're squinting at it through a handlens whilst trying to hold it. So I do recommend steadying your shell on a bit of bluetac. I had mine under a dissecting microscope (something you are welcome to come and use) and this was great. Other than one thing: the magnification makes little features like ridges seem so obvious that you wonder whether you're interpreting the key correctly. That's my only reservation.

I used a combination of keys - the Bristol key is pretty good but it's not got much detail, so where there are similar species you can't feel confident which one is correct (plus I noticed a problem for unstripey Cepeas). So Cameron's key was of most use. Plus I did look at the drawings in Kerney and Cameron and I should look at some of the photographic resources online (like AnimalBase).  I think sometimes the proportions of the shells are really important, and maybe that's something that's easier to "feel" with a photo than try to rationalise. That doesn't sound very scientific. But perhaps it's a good step on the way to Recognising your species - an expert identifier's brain puts together lots of clues at the same time. Yes I'm trying to get you to use keys, because without an expert explainer on hand to guide your every step this is definitely the way to start - it'll focus you in on what the important defining features are of each species. I realise someone who Knows Their Snails isn't often likely to be working through a key in their head, it's more about pattern recognition. But the whole Keys thing is probably a subject for another day. Meanwhile, back to the snails.

Tuesday 7 February 2017

Places to search for snails

Snails generally want a bit of vegetation and some moisture, so if you choose this group, grubbing about in all sorts of places should turn some up (grubbing about = technical term I learnt on an invertebrate id course).

With this in mind I was reading this key to snails in Suffolk by Morton and Machin, which gives a nice selection of places to try, with the (sadly often out of date) names of snails you might find there. They note that of course these aren't 'exclusive microhabitats' but in reality run into each other. And that there a few unfussy species you might find anywhere. But it gives you an idea of the typical species that tend to prefer each habitat.... in Suffolk at least. But my main point is that if you want to find different species, you need to look in a range of places.

Here's their list:

CC image by Nilfanion
1. At the bases of rushes and sedges at the edge of water (do try not to fall in).
2. On reeds, grasses and other tall vegetation at the edge of the water.
3. In the damp grass of periodically flooded water meadows.


CC image by Derek Harper
4. On the foliage of nettles, tall grass, willowherbs, large umbellifers, as on roadsides.


CC image by Evelyn Simak
5. Under stones and in the cracks of old brick walls.


CC image by Maigheach-gheal
6. In the grass on the banks of streams and ditches.
7. At the base of the ground layer in hedgerows and overgrown ditches.

CC image by Seo Mise
8. Beneath and in cavities of crumbling and decaying logs.
9. On decayed stumps covered with moss and fungi.
10. On cut or fallen stumps or branches, in crevices and under bark.

CC image by Tony Atkin
11. On branches near the ground.
12. Drier leaf and twig debris.
13. Moss, fallen leaves, and damp vegetation of woodland ground layer.

CC image by Scriniary
14. In cultivated gardens, especially in overgrown and waste places.

CC image by Roger Jones
15. In dry places on grass, other vegetation and stones, especially near the seashore.

CC image by Bob Jones
16. Under saltmarsh vegetation fringing estuaries and saltings.

I've also had some luck poking about in the soil on top of ant hills, and in amongst soil and leaf litter generally. Many species have adults which are very tiny, so you have to get your eye in! You're welcome to look at my own collection for inspiration and I can tell you where I found them.

Monday 6 February 2017

Wintery moths

CC image of sallow catkins
At the weekend I was surprised to see a tiny moth on the window in our kitchen. Perhaps I shouldn't have been surprised - just because I think it's cold and horrible doesn't mean to say that other creatures haven't made up their minds to get on with things.

So what have moths and butterflies been doing over the winter? Different species take different approaches. Some overwinter as caterpillars or pupae. Others hibernate as adults. Some survive as eggs. The adults of some species migrate for the winter to warmer climes (quite an effort but you can appreciate why).

The Yorkshire Branch of Butterfly Conservation has a page illustrated with Moths of the Month - for February they include the macro moths below. Yorkshire's probably a little different to the SW but I imagine most will be in common. I've given links to the pages at 'UKMoths' as they offer some clues to where you might find them. I think there's a bit of a theme...? Examination of woodland trees and sallow blossom (when it arrives) plus another go with the light trap sound like profitable methods.

Achlya flavicornis (Yellow horned)- woodlands and heaths with birch
Agriopis leucophaearia (Spring usher) - wingless females on tree trunks. males attracted to light.
Agriopis marginaria (Dotted border) - wingless females. males attracted to light.
Alsophila aescularia (March moth) - wingless females on tree trunks. males attracted to light.
Apocheima pilosaria (Pale brindled beauty) - wingless females on tree trunks
Autographa gamma (Silver y) - adults attracted to light
Biston strataria (Oak beauty) - deciduous woodland and suburban habitats
Cerastis rubricosa (Red chestnut) - southern woodlands
Conistra vaccinii (The chestnut) - apparently fond of sallow blossom in early spring
Ectropis crepuscularia (The engrailed) - woodland and gardens from March
Eupsilia transversa (The satellite) - seen all winter if mild, attracted to sugar and light
Operophtera brumata (Winter moth) - females virtually wingless, found on tree trunks
Orthosia cerasi (Common quaker) - attracted to light, adults seen in March/April
Orthosia cruda (Small quaker) - attracted to light, adults feed on sallow blossom March/April
Orthosia gothica (Hebrew character) - often attracted to light, sallow blossom March / April
Orthosia incerta (Clouded drab) - light and sallow blossom March to May
Phlogophora meticulosa (Angle shades) - mostly May-October "but can be found in any month"
Scoliopteryx libatrix (The herald) - hibernates as adult in outbuildings, visits light and sugar
Theria primaria (Early moth) - females almost wingless, likes woodland margins and hedges
Xylocampa areola (Early grey) - lightly wooded areas, suburban areas, attracted to light.

I've read elsewhere that you might see these very early (just out of hibernation) butterfly adults too:
Gonepteryx rhamni (Brimstone) - page in UK Butterflies
and Aglais io (Peacock) - page in UK Butterflies

The strange wingless female of Agriopis leucophaerea. CC image Fred Kohler.

I do like the tone of some of the Victorian naturalists' guides, and they're often full of practical tips (although it can be a trial to work out what species they're talking about when names have changed). Here's an excerpt from 'The Lepidopterist's Calendar' by Joseph Merrin (1860).

Most Lepidoptera, except the many hybernated species, out thus early, have apterous [wingless] females. Pilosaria males come freely to light; females occur on trunks of elm and other trees. [...] [Agriopsis marginaria] and [Theria primaria] occur freely on hedges. The females may generally be detected sitting on the twigs by the males fluttering round. Box carefully, or they will fall to the ground, and be lost. The females of [Theria primaria] may, however, be often obtained by beating hawthorn hedges, with the aid of a lantern, at night, into an open umbrella.
  
You will probably look strange with your lantern (or torch) smacking at a hedge in the dark whilst brandishing an open umbrella. But this could be the way forward if you want to see these strange creatures.

Friday 3 February 2017

More beetle resources

Haliplus lineatocollis, a relation of my find. CC image Wolfram Sondermann.
Last term I was trying to assist a very determined student in his identification of beetles for his 3rd year project. He worked very hard - they require a lot of concentration :) We were using Mike's Insect Keys, various books, the Watford Coleoptera Group, the superb guides by John Walters (scroll down for the list) and other things on Mark Telfer's site.  I've also recently noticed this guide to weevils by Mark Gurney.

The WCG is usually good for a detailed photo, but they don't have everything (admittedly we're not in Watford). But we found an alternative place to look once you've got a suspect, called Kafer der Welt (German for 'Beetles of the World'), and you can separate the species found in the UK to make a search easier. There's also The Coleopterist website which has many photos if you go to the gallery (though you do have to know the name, it's not like scanning through the thumbnails at the WCG).

For a practical this week I had to collect some creatures from the ponds. There were several species of beetle zipping about in the bucket - I had a close look at them under the dissecting microscope while they struggled ineffectually in a droplet of water. I'd been led to believe that water beetles are particularly difficult to identify, but using L.E. Friday's key (which is now downloadable from the FSC website), I managed to get two species and a good way towards another. The key's been updated now I see. I've also spotted a guide to the relatively huge Dytiscidae diving beetles on the Suffolk Naturalists' Society website (where there's also one for aquatic bugs) .

I particularly enjoyed seeing the long swimming hairs on the legs of one beetle (Haliplus confinis), and it had a interesting translucent plate covering the top of its back legs - for keeping safe a bubble of air for diving down. Also it had beautiful golden elytra (wing covers) with black lines of tiny holes. Very nice for something no more than 3mm long. I love how the microscope opens up a new world of interesting things.

The only thing is that they're very tiny so if you did put them in your collection you'd need to glue them on the tip of a tiny triangle of card, and then pin through the card. Aka "Pointing." It's a bit fiddly. But lots of coleopterists relish that sort of thing for some reason.


Identification thoughts

A lichen from yesterday, Hypogymnia physodes, and its weird inflated catpaw lobes. CC image James Lindsey.

I had a nice afternoon yesterday with student T and her extensive lichen collection. We were using a combination of guides and keys and a bit of my prior familiarity with their appearance. It made me think of two things. Firstly, that it's always a good idea to use more than one source of identification. I do love the FSC but even they can't squash everything onto a fold-out guide - lichens are great when they look like they're supposed to, but sometimes they just don't. You might think that's because they're a totally different species and I just can't identify them. But it's not always that. It's because many of them are annoyingly variable. If you went on KL's lichen jaunt around campus the other week, you'll have seen my attempt to make a guide that includes half-eaten lichens as well as pristine ones. It's not even nibbling that's the main problem though - sometimes the lichens look different just because of varying conditions where they're growing (or possibly they do it just because they feel like it, who knows). So, point one, whatever you're collecting, it helps to have a variety of (reliable) descriptions and photos. Hopefully I've given you a few options for your own group in this blog, but I'll keep looking.

Secondly, lots of people have limited transport, so only collect their lichens where they can get to around Bristol. This has the effect of making me look cleverer than I am, because the species they turn up with are generally on a relatively limited list. Nitrogen dioxide and other pollutants limit which can live in the city. So point two, if you can obtain an idea of what you're expecting, it can help. For lichens, the FSC fold-out guides are habitat based (eg urban, heaths, seaside) which is great. And when we were doing the mosses the other day, there were lists at the back of the book for different habitats (it's also online). This is useful as an additional identification strategy (especially with groups where there are many many species in this country).

Thursday 2 February 2017

Bird skulls (an aside)

I'm not sure if anyone's chosen this as their collection this year... I think not (it does rather require you to find a lot of dead birds). But there was an interesting article about the subject in this evening's Radio 4 'Inside Science', which you might like to listen to. You'll remember how Charles Darwin's encounter with the finches of the Galapagos islands and the variety of their beak shapes was a spark for his theory of evolution.


CC image of Phoenicopterus ruber (American flamingo) skull by Didier Descouens.
We've got a few bird skulls in the collection of creatures in OJ17. But not many compared to the Natural History Museum: they have 16,600 specimens. Researchers at the University of Sheffield have been making 3-D scans of these and other skulls. As they explain, "bird bills are adapted to particular diets and foraging techniques, and so can tell us a lot about the ‘ecological niche’ of species – the role an animal plays in its environment. If bill shape evolves quickly it could be that many ecological niches have been rapidly occupied, or perhaps that the diversity of available niches has dramatically increased. Either way, this provides the opportunity for the rapid birth of new species." You can assist them in their quest in a 'citizen science' project called 'Mark My Bird.' Or, supposing you have plenty of other things to do presently, you can have a quick look at their website and spend a moment twirling virtual skulls.

The photos of bird skulls at the Skull Site are easier to navigate though as they have the English as well as Latin names.

Success with mosses

mmm a Riccia liverwort. image by Show_ryu
It was extremely gratifying to see three keen new bryologists in the lab yesterday. They managed to concentrate for virtually four hours solid; it was a superb effort. They even let slip that they were enjoying themselves.

Between them they probably identified about half a dozen species, which is just excellent going for anyone, let alone a first-time attempt. There is certainly no shortage of specimens on campus to try. We examined specimens from lawns, on walls, and on trees - different habitats = different species.

We were using a combination of the BBS field key and 'Watson'. You're supposed to be able to use the field key just with a hand lens. But it's so much more interesting to be able to put the mosses and liverworts under a dissecting microscope. Sometimes the key did let us down a bit (perhaps due to our interpretation of the couplets, to be charitable). But sometimes with bryophytes you do have to admit defeat, at least temporarily.

So if you think this could be your thing, do come in and try. Or you can start off anywhere with a downloaded field key and a lens.

This is one of yesterday's discoveries - Syntrichia ruralis - with its hyaline (colourless) hair points and starry shape.

CC image by HermannSchachner
 Some very keen and thorough people at CEH/CCW compiled this document to list the attributes of British and Irish mosses, liverworts and hornworts. 'BRYOATT' has an enormous table describing the species' status, life history, habitat preferences and other traits. Here's the entry for S. ruralis.


It looks a tad overwhelming, but if you know what the codes stand for, you might be able to make some useful remarks about the species you've found. In the top right corner there are 'Ellenberg values' for L, F, R, N and S. These refer to the moss's preferred habitat: L (light) is 8 (on a scale of 0 to 9) - so this species definitely prefers well lit areas. The F value refers to how dry or damp it is where it grows: this is only 3 (on a scale from 1 to 12) and so it's an indicator of dry sites. 'R' is a measure of the acidity/alkality of its preferred substrate: at 7 (on a scale of 1 to 9) S. ruralis definitely prefers strongly basic conditions. N is 4, right in the middle of the scale from 1 to 7  which shows you how fertile (in terms of nitrogen) the site must be. And S is for salt tolerance: with a value of 0 this species is not going to be found near the coast (species on saltmarshes score a maximum of 5). HM is for heavy metals: some bryophytes are confined to spots that have high concentrations of these, believe it or not. But our species scores 0 (like almost 90% of others) because it can't tolerate such conditions.

I think it's rather interesting - and if you visit different habitats you'll see if your mosses are particularly indicative of those conditions.  Just a little thing if you fancy something extra for your notebook.

Winter twigs with alternate buds

I cannot deny that my desk is crowded with things. I've been living with the rest of the twigs from this post in the hope that I would get around to showing you the ones with alternate buds. Here's Batch One. You can already see that some are thin and some are stouter, some have tiny buds and some have bigger, some are rounded and some are pointy... you get the idea. These are the sorts of things you can note in your notebook along with a little sketch, to show how you've gone about your identification.


This is the dainty one on the left:


I followed the dichotomous key in May and Panter's FSC guide. I like to write down notes from the couplets (this is the best idea) but even if you just put the sequence of numbers you follow, that will show to the person marking your work that you've used the key and thought about the process. Here that would be 1, 17, 23, 24, 25, 39, 43, 44, 51, 55, 56, 57, 58, 59. Which brings us to a choice between the Wych elm (Ulmus glabra) and English elm (Ulmus procera). I'm inclined to think it's an English elm although these would be less common. The buds are darker than the twigs, they're not offset from the leaf scar below them, and they're not covered in orange hairs as Wych elm's would be.  You can't help thinking you'd see some orange hairs if they were there.

Above some of the buds were some little sticky-out things, which at first I was inclined to think were some weird hibernating creature. But on reflection, I think they're the first signs of the flowers - with elms the flowers come out before the leaves and are strange pink things:

CC image by Rosser1954
English elm is an endemic, only found in Britain. Its distinctive tall shape can be seen in Constable's paintings (like the Haywain). But the trees were devastated by a fungal disease in the 1970s and there are only a handful of mature specimens left in the whole country. But mine (if I am right, and it is an English elm) was only a small thing in a hedge - that's where you would expect to find this species. I think it would be rather a nice one to include in your collection.

Here's the next one
I feel like this ought to be cherry. It's got the right shape buds (longer than wide, a bit pointy with lots of scales). It's supposed to have some buds in clusters, but I'm hoping that would be lower down the twig (ah you see the value of taking good notes in the field, in your field notebook. If I had done, I'd know either way). It's supposed to have 'distinctive horizontal marks' - and it is a bit splotchy. In my favour, although it doesn't sound a very convincing answer when you use 'May and Panter', the pictures in 'Price and Bersweden' are rather encouraging. So it's worth using both books (I still have some copies to borrow if you don't want to shell out). Also, there are many different hybrids and cultivars of cherry. So this might be a bird cherry. Or maybe it's a different sort.

Next up the distinctive plump buds of hazel with convenient confirmatory leaf. It's worth looking around for clues like leaves if there are any. I don't call it cheating. Just prune it off before submission :)


I've got plenty more - there are many more alternately-budded species than opposite-budded species to collect. I'll just show you my alder twig as it has such distinctive bulbous 'boxing glove' buds.

 It's another example where there's an added clue to help your identification. I always think of alders as having cone-like rounded catkins (that's an easy way to spot an alder). But the one above is a male catkin, not a female catkin. It'll go greeny yellow and expand out to release pollen. As with the elms, this will happen before any leaves appear. I would leave the catkins on your twig when you preserve it - I think they'd make a good addition.