Showing posts with label grasses. Show all posts

Thursday, 14 June 2018

What a great day for football: all we need is some green grass and a ball.

CC image Rune Mathison / Bitjungle
I can't lie, I have no interest in football at all, but as it's the start of the world cup here's a topical Grass/Football quote for you from Bill Shankly. I discovered I was right in imagining most pitches use the ubiquitous dark green species Lolium perenne (Perennial ryegrass) - but I've been interested to learn that big grounds use an space-age interwoven hybrid of actual grass and artificial fibres. I know, you learn a new thing every day.

I'm now pleased to have 22 species of grass, virtually all from mundane, easily accessible habitats - imagine the variety if you went out and about. It being June I am aware virtually nobody is reading this, which is a shame as I wish I could persuade you to try collecting them too. Yesterday I went to the wood/grassland you much-frequented in your first year and found a few more. I'm still remarkably confused about a couple, but the more I look at, I think the more likely I'll realise what the mystery ones really are (and to realise if I've identified things incorrectly in the past). It starts making me wonder how my brain is picking this up - some of it must be rote learning and repetition, but there's an element of recognising and comparing little characteristics to those of species I already know. No doubt a psychology student could tell you more. I can feel strange things happening in my brain but I'm not sure what they are :)

I found the rather elegant Remote sedge (with spaced-out flowers and long terminal bract). CC image by P Verstichel.
 I was roaming the grassland because one of the lecturers wants an NVC (National Vegetation Classification) category for it: a method you may learn in your future classes. About half the species I found were grasses, and they're essential for an accurate NVC. So if you get good at identifying them, an ecological consultancy would probably be highly impressed at your usefulness (though the adverts I see seem to be obsessed with newts and bats - not that I don't like such charismatic creatures, but the law is highly species-ist, grrr).

Now I must attend to my new specimens and get them pressing.


Monday, 11 June 2018

More on grasses (and some quizzes)

Upright brome (with its "camel's eyelashes") cheekily taken from DP's quiz below (in a spirit of promotion).

It's a strange thing but after repeated efforts at grasses over the years, it seems I've reached some sort of breakthrough and am starting to feel some sort of familiarity with them. I hope this pleasant sensation is something you will also feel when you've spent a bit of time on your taxonomic collection.

The video below stars the author of the excellent "Field Guide to Grasses, Sedges and Rushes", Dominic Price. He's very good at showing you the distinctive characteristics of the plants. The video concentrates on meadow species and I was pleased to recognise most of them (and have taken copious notes :).


His charity, the Species Recovery Trust, have devised some identification quizzes on Buzzfeed (usually the preserve of 'Pick eight noodle dishes and we'll tell you when you'll get married' type fodder).

This one is on grasses (I got 77% right and felt rather chuffed).

There's also one on sedges  (Only 57% but that wasn't a massive surprise - I need to go and find some sedges and get back into them. They are lovely with their little utricles, don't you know).

For people who are doing winter twigs - you'll be delighted there is one for those too. 
I only got 70% right but after all the work on your tree collection I'm sure you will do better than that. It's rather good because it has questions on whole tree shapes, twig features and also just buds.

Tuesday, 5 June 2018

Keep Off The Grass

Phleum grasses are distinctive for their ROCK horns. CC Matt Lavin and AJC1.

 This is a funny time of year in my job. Most students have disappeared and I have time to do some of the interesting things that fall by the wayside during term-time. But it takes adjustment to get used to the freedom, and I actually find the campus a bit depressing when it's so quiet. So instead of sitting at my desk eating seaweed (my latest exotic find in the SU shop) I have been trying to maintain liveliness by going for a walk at lunchtime.

I took a plastic bag today for collecting things. Taxonomic collection rule number 1: Always have your bag or pot. I saw lots of grasses. They're probably responsible for all this sneezing going on at the moment so I considered it revenge to pick them. This is a great time of year for a grass collection since they're in flower - you certainly don't want to do yourself in by trying to identify them without their flowers.

Taxonomic collection rule number 2: Ignore everybody else. I was standing motionless staring into a big bed of wildflowers, looking for grasses. A student walked near me singing to himself - then he clocked me and presumably felt embarrassed for himself, and also maybe bemused for me because I looked quite strange standing there clutching my plastic bag of vegetation. "All right?" (he had to repeat this as I usually expect my strange aspect to deter communication). "Yes, I'm all right? Are you all right?" "Yes." It made me laugh anyway. So definitely don't worry about looking weird. If anybody's actually paying attention they'll probably be too awkward to ask you what you're doing anyway.

Old skool botanising, same as it ever was. CC Wellcome Images.
So get this - I found 16 species of grasses (Poaceae family) just wandering round campus. I was surprised there were so many. Imagine the marvellousness of your collection if you started grasses now, and went to different habitats and collected even more. It would have the potential to be truly marvellous wouldn't it. Well, I would be impressed at least.

I brought my haul back to the lab and was pleasantly surprised at how many I knew. Maybe this knowledge has been seeping into me slowly over the years. You see, there is hope even with apparently off-putting groups like grasses. Like anything, if you get to know the common species, you'll naturally begin to spot when something's odd and different.

And if you're in a particular habitat, there will be a certain range of species you're likely to find, which helps with identification too. I was on the MSc field trip last week to Steart Marshes, which has lots of developing salt marsh. I brought back two special salt marsh species from there (though there were more... collecting just wasn't on the top of my mind).

Botanists pressing plants in the field - yeah fine in Mexico where it doesn't rain :) CC Alan Harper.


I've pressed my finds and I'm hoping to mount them - but I'm in a good position because I already know what I'm looking at. If you've collected grasses you really want to identify them while they're still fresh, because their identification features include membranous ligules and leaf width - things that will unhelpfully shrivel when pressed. You can keep your finds in a plastic bag for a while in the fridge until you've sorted them out.

It would also be really useful to take photos or sketches of your plants in the field, as the "look" of grasses can be quite distinctive when they're en masse - sometimes they look much more shimmery or brightly coloured in the field, and that can help with identification.

If grasses take your fancy this fold-out guide is a good and cheap start. I have found Francis Rose's 'Grasses, Rushes and Ferns' the best book - it has detailed illustrations of the spikelets. The latter is super expensive, so do come and borrow one from me. It's too heavy really to carry around though, but I have had much success with Dominic Price's recent 'Field guide to grasses, sedges and rushes', which includes excellent identification Top Tips and lists for particular habitats - I'd recommend it very much.

Nice ligule. CC image by Harry Rose.
Anyway please do ask for for a bit of help if you wish, as it's useful to get some feedback from someone who knows a few species for sure.

Wednesday, 15 November 2017

Your new skills can help make a difference

A lot of moths visiting a trap in Brunei, 1982. CC image Accassidy.
The other afternoon I was listening to Inside Science on Radio 4, and they had a piece about 'moth snowstorms'. That is, people were remembering when they would drive along in the countryside at night, and moths would be flying in from all angles into their headlights, and they'd have to start their windscreen wipers. It's certainly not something I've experienced in my lifetime. In fact it seems quite a mad idea, even though it must have been unremarkable not so long ago. Something that did ring a bell was motorcyclists saying they used to have to stop regularly and clean their visors of squashed flies. I can remember (in the 90s) saying to my dad that my friend's car was covered in gummy dead insects, and him complaining that it must have meant we were driving too fast. Some people suggest cars might be more aerodynamic these days, which might account for why gummy insects don't seem to be a problem. But that doesn't explain the visor thing - there'd still be insects on visors.

My point is, we seem to be losing insects, fast. Data from amateur entomologists' malaise traps suggest a loss of 75% in the last 25 years. I don't need to tell you that sounds pretty terrifying, when insects are a fundamental part of the food chain and pollinate a lot of plants (including our food plants). It was astoundingly refreshing to hear that the alleged environment minster, Michael Gove, has actually come round to the idea that neonicotinoid pesticides need stricter controls. One can only hope it's not shutting the door after the horse has bolted. You'd imagine spraying pesticides all over fields can't have helped matters, in addition to problems caused by other modern farming methods. So perhaps stopping spraying them might help restore some of the invertebrate populations.

A malaise trap. CC image Ceuthophilus. Nothing to do with uneasy-feeling malaise (though that may be for the insects), but actually invented by the Swedish Mr. Malaise in the 1930s.
Whilst this sounds like environmental doom and gloom (which yes, it probably is) - you have chosen this degree course so presumably want to try to make the world a better place. You can be part of the antidote to your own gloom. By developing your identification skills and submitting records to recording schemes and records centres, you can help make some difference. Your data can feed into a big picture which can persuade the powers that be to actually do something. This might not be a straightforward process because it involves politics. But having the scientific evidence has to be of critical importance, surely.

You might think "ah, what difference can I make? :( " But there really aren't that many people out there who have good identification skills. Particularly if you focus on something even slightly obscure. If you chose to go to a local habitat and record what you find, it's possible that nobody would have done that for ten, twenty years (or even ever). You might find something Really Interesting, and conceivably that could help get the site a modicum of protection one day. And even if you don't, it all becomes part of valuable data about today, and can be compared with what happens in future, and if records exist, with what was present in the past. (iRecord is an easy way to submit a record of anything you find, but if you prefer the support of a specialist scheme, the Biological Records Centre has a comprehensive list of contacts.)

Student A's lovely lichen find. CC image Jason Hollinger (California)
The other day, one of the third years popped in to see me. She chose lichens for her collection last year and got really into them. She'd been out lichen-hunting recently. When she got home and looked in her 'Dobson' guide, one of them seemed to be something unusual. The only species that seemed to match was a distinctive orange-grey lichen with little eyelashy spines around the fruiting bodies. But Dobson said it had only been seen in very few areas and was now thought extinct in this country. She had a tiny sample and we both squinted at it down the microscope. Nothing else seemed to match. I said I thought she should speak to David Hill, my esteemed lichen tutor from my course.

It turns out she was right with her identification and he was "super excited". Isn't that amazing! So this is proof that you too can find and report something excellent. She's brought something back from apparent extinction. I guess the poor lichen was never quite extinct in the first place (though it's evidently very rare) - but the point is, how many people are looking at lichens, and how many people have the skill to identify them? Not many. So your developing skills can make an impact. You can be one of an elite group that is knowledgeable and enthusiastic about lichens, beetles, mosses, or whatever it is that grabs you. We can only conserve things when we know they exist. You will be able to contribute to the body of knowledge of what's out there. Be encouraged.

There are links to over 200 recording schemes at the NBN Gateway.


Friday, 3 November 2017

For your Christmas list*: a hand lens

(*Other popular religious and secular present-buying opportunities are available. Or just treat yourself.)

I've just been to Dartmoor with the new first years. Likely you went on this trip yourself and will be able to recall the amazing Wistman's Wood, an eldritch botanical wonderland dripping with lichens and mosses. I think it's one of my favourite places.

CC image by Alex Jane
Students are obliged to spend some time collecting data about un-botanical things like wind speed. But whenever possible I tried to lure them towards close examination of the weird and diverse species covering the trees and boulders. A few people looked like they got seriously hooked, which was very gratifying. And I think the secret to an appreciation of lichens and bryophytes is a simple thing: a hand lens.

I wish I could present one to everybody but it seems university bean-counters are not keen. I can always lend you one (quality and smeariness varies). But ultimately I would urge you to consider getting one yourself. It doesn't have to cost much and it will last you a lifetime. Plus you will always have it to hand if it just lives in your bag. And you won't have any slight squeamishness about holding it right up to your eye after a dozen other people have had it in their clammy hands. Seriously, it will open up a entire microscopic world that you cannot really predict. I'd say it makes Everything more interesting - the unsuspected detail of plants and invertebrates and all sorts. But in the short term it'll certainly make your collecting a more interesting experience and make it easier to identify what you're looking at.

Like I say a million times, 'Hold it right up to your eye'. CC image from the National Park Service.
But what to get? Magnification of x10 is fine for most things. You can get twin versions which have (say) a x10 at one end and a x15 at the other if you're feeling fancy. Another thing to consider is the diameter. My lens is about 15mm across. Larger diameters are recommended.  I thought I was quite happy with mine but now I'm starting to wonder if a larger diameter wouldn't be better - it transmits more light and makes things easier to see.

You do want something that's of good enough quality that it's not going to annoy you with its blurry pointlessness. You don't necessarily have to spend huge amounts though.

This Quicktest page shows you how different lenses vary in quality (which is quite eye-opening) and therefore in price. They have a large range for sale and they make it very clear what you're getting. There are also many other reliable places, like the local company Brunel Microscopes, or UKGE, or entomological suppliers like Watkins and Doncaster,

 This is the one I have at the moment, from Quicktest, which is about £30 with delivery. It has a slightly larger size than most, so lets in a bit more light, and seems super clear - I'm really pleased with it. But you don't have to go that mad - something about £15 can be pretty decent, judging by the advice linked to above. Cheaper ones are a good way in but they're necessarily blurrier and more likely to fall apart. I bought a load of half-decent ones for work last year, but they're extremely pocketable and disappear constantly. This is disappointing and makes me loathe to spend as much again - but then spending less is a false economy if the lenses are rubbish. So if you're even half keen it's a good reason to get your own and look after it - it should last a lifetime if you don't lose it!

I'd also recommend getting a lovely bright lanyard to attach to it. Then it's much easier to find if you put it down somewhere or it falls into the vegetation. There's a huge selection on Ebay, for example. If you wear your lens round your neck you will recognise and be recognised by other natural history buffs, like some sort of weird masonic tie / handshake. This is not necessarily a bad thing: you might meet someone knowledgeable and interesting. Nerdy, probably. But nerdy about something interesting.

Public domain image by Bill Gillette - girl on a fieldtrip in the Rockies, 1972
A useful thought I read recently - when you're using it, think of it as a keyhole. That is, you must put your eye right up to it to see through. Either bring the object you're looking at towards your eye, or (often more undignified but unavoidable) bring yourself close to the object. The latter is why you might see lichen enthusiasts sprawled across the landscape, bums in air, apparently pressing their faces against the rocks.

And finally, it's possible to integrate this low-tech highly-useful bit of equipment with modern technology: with a bit of practice you can take photos through it with your mobile phone. And those would be perfect stuck in your notebook.

(P.s. - What's more, a lens will repay you handsomely on the field trip to Tenerife, where there are many fascinating plants with strange adaptations to examine microscopically. I much recommend getting one in readiness for that).

Wednesday, 1 June 2016

Grasses as an idea for a late spring collection

I had an extremely quick mooch about looking for grasses between the car park and the office this morning. I think I found eight grass species with flowers, certainly seven. It was raining when I left the house so I didn't hang about, but I know there are at least two more in the verges there. And down the road there is some limestone grassland and I know there's another species or two there. Plus I've recently seen three more species in a wood. This comes to 15 species already. Fifteen. So if you're looking for some inspiration, grasses could be the thing.

Image by Matt Lavin.

These are my basic grass-collecting tips:

- Ideally visit a number of different habitats - roadsides, woods, the edge of arable fields, meadows, different geology (acid, calcareous), next to the seaside (eg salmarsh, sand dune). That's how you'll get lots of species. And the more species the better.

- Pick stems that are flowering.

- Pick them all the way down to the ground.

- If the leaves at the bottom are different, make sure you get those and make sure you keep them with the right specimen. Attach a label so you know where you got it from. And make some notes in your notebook about where you are. And maybe draw a picture of the grass in situ.

- It doesn't matter if you fold them up to get them into your plastic bag - you're going to have to fold them to get them on a page unless they're very small. But try to fold them cleanly just once or twice.

- You can store them in the fridge (with the bag all tied up) - but try to identify them as soon as possible or the ligules (an important identification feature) may deteriorate.

- Don't forget to write down your thought processes and draw some pictures in your notebook.

- As soon as you've identified them, get them pressing. You can see details here, it's very low tech but it works fine.

I'm not saying they're easy, they're not. But at least you should be able to find a good variety. And that's a good start. You can read some more via the 'Grasses' link on the left. But please do come and see me with a few specimens, and we can look down the microscopes and figure out all the important grass features together.
Wood melick, by Gilles San Martin. Mmmm wood melick, I like this one.
Some of the species I've seen recently:
Wood millet, Milium effusum
Wood melick, Melica uniflora
Cock's foot, Dactylis glomerata
Timothy grass, Phleum pratense
Annual meadow grass, Poa annua
False brome, Brachypodium sylvaticum

Friday, 25 September 2015

General thoughts on collecting


Finnish entomologist Johan Sahlberg and his botanist wife Mimmi, just before they left on their honeymoon field-trip in 1873. Photograph by Antero Saalas.

 The Legal bit: Technically, you should only collect where you've been given permission by the landowner. Realistically, if you collect a sprig of grass from a roadside, no-one is likely to demand you are thrown in jail. But bear it in mind that under the Wildlife and Countryside Act, it is illegal to uproot any wild plant without permission from the landowner. 'Plant' includes algae, lichens, mosses, fungi and vascular plants. You don't need to uproot anything of course, just take parts of it. If you haven't got permission to be on someone land, you shoud confine yourself to public land and footpaths, or else you could get in trouble for trespassing, and that's before you've picked a thing. It doesn't hurt to be following the Countryside Code in general.

It is quite complicated in law, because there's no single law that covers such things. You do have some rights as a 'forager' which have built up around collecting plants for food. The British Mycological Society have some sensible advice regarding picking fungi but you'll find there's increasing worries about people collecting large amounts of mushrooms and then selling them to fancy restaurants (selling things on is not really in the spirit of traditional foraging).

Also, it is very tempting to want to go to a nature reserve to collect - after all, that's surely where all the nature is? Actually, you'll find you can collect a remarkable number of species from uncontroversial places. If you really do want to collect at a nature reserve, you should ask first. In my experience they may give permission - just contact the relevant Wildlife Trust (etc.) and explain you are doing a taxonomic collection for university and only want a specimen or two of common species. Reassure them that you will not be digging anything up, least of all their rare species. Always take the minimum amount of material necessary wherever you are.  

 There's more advice in the Wildflower Society code of conduct. You might also want to read the Botanical Society of Britain and Ireland's code of conduct. It encouragingly says "Collecting small amounts of plant material for identification purposes, for private herbaria, for research or as voucher specimens is usually acceptable, except in the case of protected or Red List species. Indeed, collecting is often necessary if botanical expertise is to be developed."

 The Amateur Entomologists Society has similar advice concerning invertebrates. Although I feel pangs of guilt killing them, the main threat to species in this country is habitat loss. The code points out that "collecting should always be limited to the minimum necessary for the purpose intended, as well as by full compliance with legal requirements relating to particular sites and species."   

It is rather unlikely you'll come across rare species (the clue being in the name). Surprisingly, very few are specifically protected by law. Obviously, if you're in a reserve where one exists, you should make yourself aware of its appearance and avoid collecting any.

In short, use common sense and all will be well. Stick to public places and no-one will threaten you with a shotgun. Develop a casual demeanour and learn to shrug off the strange looks the public will doubtless throw you. Never be without a plastic bag or collecting pot. The latter is the best bit of advice I can give you :)

 
The Health and Safety bit: 

If you look at the course guidance on Blackboard, you will see that before going out collecting it requires you to send a risk assessment to Katy. This is not so onerous, as there is a generic version on Blackboard - you just need to go through it and remove anything irrelevant to your own situation, and perhaps add in anything extra. 

For example, you can delete any of the chemicals you won't be using for preservation. You've survived this long so presumably you are good at common sense - but here's a recap anyway-

Take someone with you (it's more fun, besides).
 Let someone know where you're going and when you ought to be back (a map and a phone are useful too).
Especially if you're like me, take a snack and something to drink so you don't pass out in a ditch.
Take your medicine with you if you suffer from some life-threatening illness (now I feel like I'm talking to my mother).
Take some sensible clothing and footwear with you (and now I am turning into my mother).

Fill in your details on the form - send a copy to Katy and keep a copy for yourself.
Then you can go forth and start collecting.


Thursday, 13 August 2015

Identifying grasses

Lolium multiflorum CC image by Matt Lavin
I think a good place to begin is the Field Studies Council's fold-out guide (a bargain at £3 or we have some you can borrow). The pictures are small but clear, and the reverse features an excellent lateral key which will get you looking at important features like ligules, glumes and awns. The guide has 30 common species so it won't have things you might find in unusual habitats.

I went on a little botany class at my local nature reserve and the tutor was using Dominic Price's Field Guide to Grasses, Sedges and Rushes. I've found this really useful this year and recommend it heartily. It's full of good photographs, and being a little booklet is really useful in the field. There are a couple you can look at in the field centre.

Rose's 'Grasses, Sedges, Rushes and Ferns of the British Isles and north-western Europe' has much more detailed drawings. It's big and quite expensive and not very convenient for lugging round the countryside - more the sort of thing to consult back in the lab. It's got a dichotomous key to the species (you will remember that showing you can use one is part of your assessment). There are detailed drawings and I like the simplicity of the descriptions: you can see what the distinguishing characteristics are quite easily. This is my favourite one to look at in the lab. Likewise, you can consult our copies.

Some people prefer Fitter, Fitter and Fitter which is shorthand for their Collins Pocket Guide to Grasses, Sedges, Rushes and Ferns of Britain and Northern Europe. This is more pocket-sized and has very clear diagrams. The key is different - it's a 'single access key' a bit like the one on the back of the FSC fold-out guide. It's rather helpful to have two different approaches like this, when you're starting out on something new (it increases your chance of getting to the right answer!) Sadly it seems to be out of print and second-hand copies sometimes quite expensive. But you can borrow ours if you can't find one.

 I've recently discovered this online key from the Field Studies Council. You tick off the features your grass has and it points you at the most likely family, and then suggests species. I think it might be most helpful for someone who's already picked up some of the terminology, as there aren't any supporting diagrams or photos until you get to the end.


A classic book for grasses is "Hubbard" - a Penguin paperback first published in the 1950s. I'm not so keen because I find it confusingly detailed, but some people love it and it has very comprehensive diagrams of the glumes and lemmas etc. I do like the lists in the front which suggest species for different habitats. It's got a dichotomous key too. You can pick one up very cheaply.

If you want to feel like a Proper Botanist then "Stace" - and his 'New flora of the British Isles' is absolutely the industry standard for vascular plants, so I feel obliged to mention it. But it can be a bit daunting - no illustrations and everything's in there, including all the rarities. Maybe not a good place to start. But you can come and look at our copy, or there's one in the library.

Recently I bought Cope and Gray's 'Grasses of the British Isles'  - it's a new handbook from the BSBI and its layout reflects new thinking about grass taxonomy. I'm sure some grass fans will like it but I'm not massively keen, and I don't like the key. But it's here if you want to have a look.


The usual advice about collecting applies (though realistically no-one is going to do anything but give you a funny look if they see you cramming grass into a carrier bag at the side of a road - I speak from experience). Take the specimen from down at the base (don't dig up the roots, they're not usually important to identification anyway). Make sure you make a note of the form of the plant - is it in a definite clump? This can be a useful characteristic to know.

You want to remember where you found your specimens and be able to cross-refer to the right part of your notepad,  so you might find it helpful to make or buy 'jewellery tags' like in my picture below (modelled by a winter twig).


When you arrive home you can store them in the fridge for a while without too much wiltage. But you really want to get them identified while they're fresh, when important features like ligules are at their best. Then (also before they've wilted) you want to put them in your botanical press.

I've also written about how to mount your grass specimens for display. You should check you are using up-to-date names with the Natural History Museum's database (more can be found on the 'what' page).

Dave M. is an accomplished agrostologist on the quiet, so if you do have any questions, do come and see us.

Tuesday, 30 June 2015

Mounting winter twigs and pressed plants

Here's a specimen of Juncus articulatus (Jointed Rush) which I collected for some of my own coursework. I'm afraid the page didn't fit on the scanner (indeed the rush was so large didn't fit on the paper either, so I had to think ahead and remembered to press it bent around).


You can submit separate sheets, or if you're dealing with something very flat (like ferns or grasses) you might want to use sheets that are bound (in a pad of drawing paper for example). Some people put their completed sheets of twigs into ring binders or multi-pocket files. In fact, some students don't use paper at all, but attach their collection to one big piece of card. It can look very effective (try to arrange the specimens with taxonomy in mind). It's less portable though.

Herbaria would use sheets of acid-free paper which won't deteriorate or discolour over time. We have a small supply of this but the sheets are not terribly stiff (you may prefer an artists' pad with a heavier weight).

You can attach your specimens with a dab of glue (slightly watered down PVA is good) - but herbaria often like to use a less permanent method, so the plant can be removed for closer scrutiny if necessary. In the photo above you can see how I've used little strips of paper knotted at the back of the sheet. It looks rather good, though I say it myself. You can come and see the herbarium sheets in person if you want a closer look. This is how to do it:


Alternatively, you can leave the strips un-knotted as below (this probably won't work as well with heavier twigs):


Sewing specimens on with thread is another option. Twigs might benefit from being attached by thin wire if you're using a big piece of card to back them (you can buy A1 pieces of 'mountboard' in a rainbow of colours from art shops - they're usually about £4).

You could just use strips of sellotape or other tape - this can look ok if you do it carefully, but unless you use something of 'archival quality' it may eventually dry out and drop off, or stain your paper. (You might not be thinking quite so long term. But it's nice if you can produce the best thing you can and get a few extra marks in the process, and sellotape isn't very aesthetic). I don't like it much, but that's just my opinion.

Large specimens of ferns and bulky flowers / seedheads might be much harder to attach like this, so glue is probably a more sensible choice for those.

If you've got loose seeds you'd like to include, you can put them in a little packet and glue that to the sheet (traditionally at the top right).

The label with all the what, where, when and who information traditionally goes in the bottom right corner of the sheet. I had some preprinted labels to use when I made a collection of grasses last year: you could make a similar template, or just write the bare information straight onto the sheet.


The University of Florida Herbarium has a webpage if you're interested in more detailed methods.

Nepenthes (carnivorous pitcher plant) specimens at the Paris NHM Herbarium (CC photo by F Mey)

You can see some examples of how people presented their 2016/17 'trees in winter' collections here.

In 2018/19 someone presented their seaweed sheets in a very professional looking drop-front box like this and they looked great, and were easily accessible - you could use such a thing for any collection fastened to paper or card.

Thursday, 25 June 2015

Using a botanical press

If you're collecting flowering plants (including grasses) or ferns, you'll need to press your specimens before you mount them for your collection. Not only will it flatten them, it'll dry them out - preserving them from mouldering and rotting. Well preserved specimens will last long after your handing-in date: the oldest surviving herbarium collection is Italian and dates to the 1530s. Here's a carnivorous pitcher plant that was collected in the 1890s - it's the 'type specimen' for its species (the exact specimen that was collected and found to be a new species, and was then described and named).

The lowest-tech way is to bring your specimens home and then flatten them under a big pile of books and newspaper. It's better to get pressing as soon as possible before your specimens start looking wilted and sad.

You should leave a little label in with each one to remind you where you got it and what you identified it as. It's better to write a label because the other important thing to do is regularly change the newspaper. If you write on the newspaper you might forget to transfer the details across!

If you can, to aid drying, you could sandwich the plants in between layers of blotting paper as well, with newspaper layers between each blotting-papered specimen. You just change the newspaper, rather than the blotting paper. You can also put in layers of corrugated card in an effort to get the moisture out.

With most reasonably dry specimens, just newspaper should be ok though. But don't just abandon them - you do need to change the paper especially at the beginning, or your specimens could go mouldy.

When you first put them in, they might be unruly, but try to arrange the leaves, stems and flowers neatly, and not twisted / overlapping each other. It can be difficult, but if it's not exactly right, you'll get an opportunity to adjust them when you change the newspaper for the first time (their flatness often means they are more cooperative then) - do this change only one or two days after you first put them in. After that, how often you change the newspaper depends on how succulent your plant is - the wetter it is, the more often you'll need to do it and the longer it'll take to dry - check it every couple of days to start with, but if it's looking fine, then leave it longer. They'll be sufficiently dry for mounting in a matter of days or weeks, depending on size - you'll have to check and judge.

If you've got a specimen that's longer than your press, you can carefully zig-zag it. This especially applies to many grasses and ferns - though it's useful for ferns as it allows you to show the sori on the underside of a frond.

If you have a plant that drops its seeds, you can put them in a little envelope and keep them in the press. Extra large flower heads or pods can even be cut in half to help them dry.

If you want to be a bit more professional, you can make a field press. You can buy them, but I think it would pain me as they can be absurdly expensive, and are often not very big.

What you need (believe it or not) are two large cake drying racks like these:
They'll be the outer layers - the gaps help moisture escape. Put a layer of corrugated cardboard as the next layers in, and then your stacked layers of:
newspaper
blotting paper
plant specimen
blotting paper
newspaper.
You can also put some cardboard here and there between those layer groups, to help wick out moisture.

Now you need something to hold the whole creation together - you need two adjustable straps that you can pull very tight (VERY tight, use your knee or foot to brace yourself a bit!) - some sort of strap with an adjustable buckle. Canvas belts might do it or luggage straps. Space them out so they're squashing everything as evenly as possible.

When everything's secured, you can store it somewhere gently warm, like next to a radiator. I've read that people who live in hot climates recommend you attach your press to your car roof and drive it around like that to help dry the specimens. This may not be the best course of action in Britain. But it does remind you that you can take your press into the field and add specimens to it as you walk around - this can be best because they have the minimum time to wilt.

You can see lots of home-made presses in this google search, so do feel encouraged to have a go. But realistically, sticking specimens under a pile of books isn't a bad option. Don't forget to change the newspaper though!

I've also made some suggestions on how to mount your pressed specimens. 
If you're collecting large ferns you might want to fold some over so they take up less space - you'll want to show the sori on the underside in any case.

Tuesday, 23 June 2015

Some words about the marking scheme

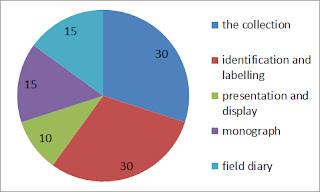
You can read the official guidance on the marking scheme on Blackboard. This is the basic structure:


You can see that you're going to pick up a lot of points merely by getting organised early and doing the things the guidance asks you to do - it's not some subjective number plucked out of the air, so make sure you're following, and it you can get a high mark!

The 30% for 'the collection' means you'll be assessed on the quality and quantity of your specimens. Keep collecting throughout the year and you will get lots to put in - try not to leave everything until the last minute. People often ask how many they should submit, and I've written some thoughts here. Choose specimens that are undamaged and show the critical diagnostic features. Preserve them in a manner appropriate to the group you're collecting.

With 'identification and labelling' you can easily pick up marks just by including all the essential what / where / when / who information. Of course, accuracy of identification is very important! But if you collect a wide variety specimens you may be able to afford leaving out any you're unsure of. It's better to submit fewer specimens which are identified correctly, than loads of which half are wrong.

Presentation and display only offer 10 marks - but if you can be neat and set your specimens out taxonomically, clearly and attractively, it's surely an easy 10 marks? If your handwriting is illegible (or even if it's not) you can print your labels. I've tried to offer some advice about ways to display your specimens in the information about each taxonomic group. You can go down the traditional route or let your imagination roam.

The official guidance sets out in detail what should be in the field diary and the monograph- if you make sure you follow its advice, you will get marks accordingly! As I've said elsewhere, the field diary "only" gets 15% of the marks. But recording things in it diligently will pay dividends when you come to identify and label your specimens.

Just a small word of caution - some of the group-specific guidance on Blackboard is quite 'vintage' so be aware that some identification books recommended may have been superceded... I hope I've given you some more recent ideas on this website though.

Monday, 22 June 2015

'Who' - the final bit of essential information

The author assists a student in identifying some aquatic invertebrates


There aren't that many people out there who have the skills you'll develop while you're doing this assignment. 
And not only that, you'll be producing a record of the species that exist out there right now - and quite probably (because not that many people are doing such a thing), the species you collect and identify might not have been noted from the particular area you took them from before. Possibly ever, and at the least, often not for a long time.
So your records could be really useful - they can feed into a bigger picture about the biodiversity of this country and how it might be changing.

Around Bristol you could send your records to the Bristol Regional Environmental Records Centre (BRERC) - the people there would ensure your data would be sent to specialist recording schemes (see below) and eventually added to the National Biodiversity Network (NBN) Gateway. From there it could be used for all sorts of useful research, even contributing to scientifically supported changes in government policy (yes such things have been known).
If your gathering took place further afield, you can find the appropriate records centre on this list from the National Forum for Biological Recording.

Or, you may prefer to send them directly to one of the many recording schemes for specific groups of organisms: the national Biological Records Centre has a list of them (including certainly niche but perhaps nerdily cool things like slime moulds, ticks and stoneworts). In fact, if you get really into your subject, you'll be able to find much future support from these groups.
Different recording schemes might require your records in slightly different formats - but one thing all of them will want is the What, Where, When and Who.

The Who is you - as it's likely that you will have both collected and identified your specimens. So technically, you should add your name to each of your labels.
Without the who, you've certainly got a taxonomic collection, but you haven't truly produced any biological records with a potentially wider value. However, you may say that your work is supposed to be marked anonymously, and that you don't want (and shouldn't have) your name on it. You certainly won't be marked down for not putting your name on it, and from the point of view of the university, you probably shouldn't put your name on it. There is the dilemma and I leave it with you.


'When' - the third essential thing on your label


Make sure you distinguish your records from those of these US botanists one hundred years ago: write '2015', not just '15' for the year.
 Each specimen you submit should be labelled with the date you collected it.


You want to make this as unambiguous as you can.

In Britain, we usually write the date in the form Day : Month : Year. so 1/4/2015 means the first of April.
 But Americans tend to put Month : Day : Year. 1/4/2015 meaning the fourth of January.

Some people even put the Year first (I know, how crazy can you get): 2015/4/1 - and who knows what on earth that's supposed to indicate.

So to be clear, I suggest you use this format:
the day as a number, the month in words, and the year in full:
1 Apr 2015.

Here's a hypothetical label you might stick in with a snail. Obviously yours would be beautifully neat.


You can see I've got two dates, one for the Col (collected by) date, and one for the Det (determined by) date. The date it was determined (that is, identified) isn't so important, so just gets the year.

You may rightly consider this double-date business overkill, but it is an example of what might happen if a specimen were sent away for a specialist to identify. Or perhaps if a collection were very old and a museum curator was going through it checking the identifications and updating the names.

Noting 'When' is not just about good administration. It can help you (and your marker) identify your species.

Image CC by Chrumps


This year I saw an adult Rose Chafer beetle (Cetonia aurata). The adults are only present in the summer, from May until July. The beetle's lifecycle takes two years though: the rest of the time it exists as a larva feeding underground. Therefore, if I labelled my beetle with a February date, you can be fairly sure I've either misidentified it, or that global warming must be really speeding up now.

Read on for the final element of your labels - the 'who'.